|
Tutorial de Tetê
Link tutorial original:
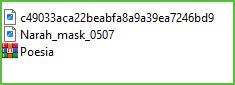
Poesia
|
| Tubes Principais:
VM Tubes
|
| Link material:

You need a wordart
|
| Plugins: Plugin Flaming Pear
/ Flexify 2
Plugin Toadies / What Are You?
Plugin Tramages / Tow The Line
Plugin FM Tile Tools / Saturation Emboss
gittes plugins / gittes supertile
|
SCRIPT
01. Open the PSP, the tubes and the mask
02. Copy the tubes and mask
03. Paste as new image
Close the originals
Work with copies
04. Choose two colors that match your work
A dark color for the Foreground and a warm color for the
Background
05. Open a new transparent image with 1000 x 700px
06. Selection/Select All
07. Copy the .jpg image and paste it into the selection
08. Select none
09.Adjust/Hue and Saturation/colorize
Enter the color you want for your tag or In case you have chosen
another image
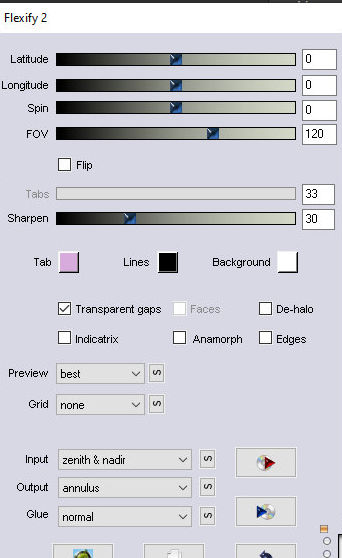
10. Effects / Plugins / Flaming Pear / flexify 2
0 0 0 120 33 30 zenith&nadir annulus
11. Layers / New Raster Layer
12. Layers / Arrange / Send to Bottom
13. Prepare a Radial gradient using your chosen colors
Angle: 135 Repeat: 10 Center Point: 50/50 - invert unchecked
Paint the image whit this gradient
14.Adjust/Blur/Gaussian Blur: 40
15. Activate the top layer
16. Layers/Duplicate
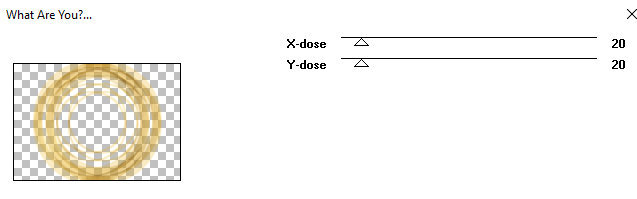
17. Effects / Plugins / toadies / What are you?
20 20
18. Activate the background layer
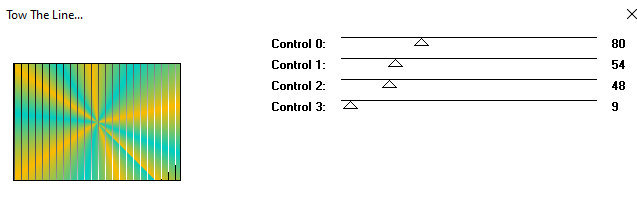
19. Effects / Plugins / tramages / Tow the Line
80 54 48 9
20. Activate the middle layer
21. Activate the Magic Wand(T=0 / F=0) and select the center of
the figure
22. Layers / New Raster Layer
23. Copy the chosen landscape and paste it into the selection
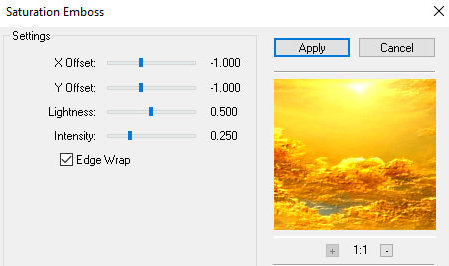
24. Effects / Plugins / FM Tile Tools / Saturation Emboss /
Default
25. Select none
26. Activate the Raster 1 layer
27. Drop shadow: 3 3 80 0 black
28. Activate the top layer (copy of Raster 1)
29. Merge Down
30. Activate the background layer
31. Layers/duplicate
32. Image / Mirror / Mirror Horizontal (Mirror)
33. Layers / Properties / blend Mode: Lighten
34. Merge down
35. Image / Mirror / Mirror Vertical (Flip)
36. Activate the top layer
37. Image/resize: 80% - all layers unchecked
38. Drop shadow: 0 0 80 40 black
39. Image / Add borders / symmetric unchecked / 5px / Dark color
40. Image / Add borders / symmetric unchecked / 5px / Light
color
41. copy the image (it will remain in memory)
42. selections / Select All
43. Image / Add borders / symmetric unchecked / 50px / Color #ffffff
44. Selections / Invert
45. Paste the image copied above into the selection
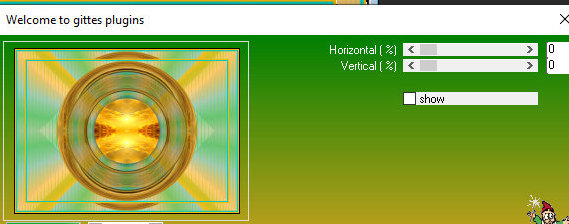
46. Effects / Plugins / Gittes Plugin / Gittes Supertile
0 0
47. Selections / Invert
48. Drop shadow: 0 0 80 40 black
49. Select none
50. Layers / New Raster Layer
51. Paint with the color #ffffff
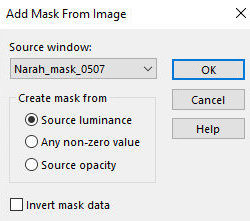
52. Layers / New Mask Layer / From Image / Mask[Narah_Mask_0507]
53. Merge Group
54. Layers / Properties / blend Mode: Overlay / Opacity: 75%
55. Copy your main tube
Paste as new layer
Resize if necessary
Drop shadow of your choice
Position as desired
56. Copy the wordart you chose
Paste into image
position where you want
57. Image / Add borders / symmetric unchecked / 5px / Dark color
58. Resize your tag to width: 900px - all layers checked
59. Put your signature
60. Merge all
61.Adjust/sharpness/Sharpen
62. Save as jpeg