|


This tutorial is from Angela das Graças who I
thank for letting me translate her tutorials
*
Original here
*
Tubes:

*
Material

*
Plugins
Tramages / WeeScratches
Tramages / Quilt
Tramages / Glass Pyramids
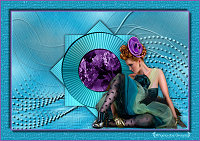
SCRIPT
01. Open the material on the PSP / Duplicate (shift+d) / close the
originals
02. Choose two colors for your tube: a dark color for the foreground
and a light color for the background
03. Minimize the mask
04. Prepare a Linear gradient
05. Open a new transparent image measuring 1000 x
700px
06. Paint with the gradient
07. Effects / Artistic Effects / Halftone
08. Effects / plugins / tramages / Wee Scratches
09. Effects / Plugins /Tramages / Quilt
10. Effects / plugins / Tramages / Quilt
11. Layers/Duplicate
12. Image/Resize: 60% - all layers unchecked
13. Effects / Image Effects / Seamless Tiling - default
14. Drop shadow: 10 10 60 10 black
15. Repeat Drop Shadow with negative V and H
16. Add new layer
17. Paint with dark color
18. Layers / New Mask Layer / From Image / Mask [1250182446_nikita_masque]
19. Merge Group
20. Image / Mirror / Mirror Horizontal
21. Effects / User Defined Filters / Emboss 3
22. Layers/Duplicate
23. Image / Mirror / Mirror Horizontal
24. Merge down
25. Layers/Properties/Blend Mode: Dodge or other
26. Copy the deco [Calligraphy-Bolas-Deco03-Loivarice] and paste it
as a new layer
27. Position in the upper left corner according to the model
28. Layers/Duplicate
29. Image/Mirror/Mirror Original
30. Merge down
Note: You can color according to your colors
31. Copy the tube character and paste it as a new layer
32. Position according to the model or as you prefer
33. Resize if necessary
34. Drop Shadow of your choice
34b. Decorate your work as you wish
35. Image / Add borders / symmetric marked / 2px / light color
36. Image / Add borders / symmetric marked / 20px / dark color
37. Image / Add borders / symmetric marked / 2px / light color
38. Image / Add borders / symmetric marked / 50px / any color
39. Select this 50px border with Magic Wnd (tolerance/feather=0)
40. Paint with the gradient 41. Effects / Plugins /
Tramages / Glass Pyramids=4
42. Selections / Invert
43. Drop shadow: 8 8 60 8 black
44. Repeat Drop Shadow with negative V and H
45. Select none
46. Image / Add borders / symmetric marked / 2px / light color
47. Image / Add borders / symmetric marked / 2px / dark color
48. Image / Resize: width=1000px - all layers checked
49. Put your signature
50. Merge All
51. Save as jpeg
*
If you do my translation, I will be very happy if:
> You let me know if you find any errors
> Send a copy of your version to my email *
>If when sharing you mention that you used my translation, thus
valuing my work
*MY EMAIL - veramendespsp2@gmail.com Tutorial traduzido em
11/03/2024
*
 |


