|


This tutorial is by Angela das Graças, who I thank
for letting me do her translations
*
This tutorial was a tribute from the author to her friend Nena Silva
*
Original here
*
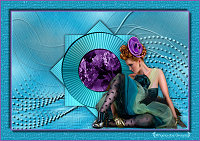
tube

*
Material

*
Plugins
Xero/Artworks
Xero/Fritillary
Xero/Fuzzifier
Simple / Diamonds
Simple / Zoom Out and Flip
SCRIPT
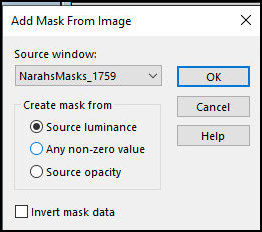
Open the mask [NarahsMasks_1759] and minimize
Save the selection [046 ] in the PSP's Selections folder
Open material / Duplicate (shift+d) / Close originals
Choose two tube colors: put the dark color in the foreground and the
light color in the background
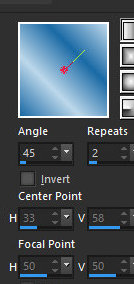
Prepare a Linear gradient
[Angle 45 / Repeats 2 / Invert unchecked]
Open a new transparent image measuring 1000 x 700px
Selections / Load selection from disk / Selection [046 ] / MOVE TO
UPPER LEFT MARKED

Paint with the gradient
Select none
Layers/Duplicate
Image / Mirror / Vertical Mirror (flip)
Layers/Duplicate
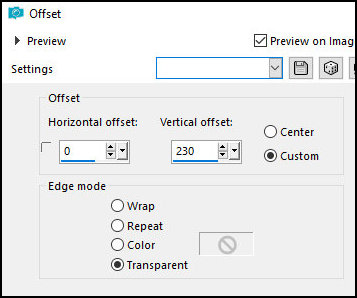
Effects / image Effects / Offset=0/230/transparent
Merge visible
Drop shadow: 5 5 60 5 black
Layers/Duplicate
Image / Mirror / Mirror horizontal
Layers / Merge / Merge down
Add new layer
Layers / Arrange / Send to Bottom
Paint with the gradient
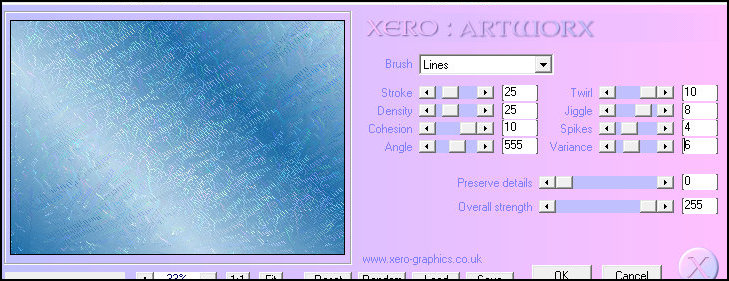
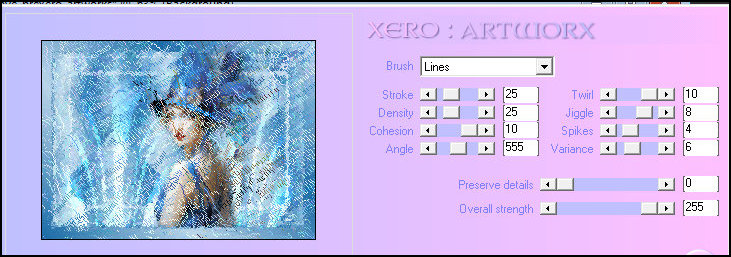
Effects / plugins / Xero / Artworks - 2 times
[lines 25 25 10 555 10 8 4 6 0 255]
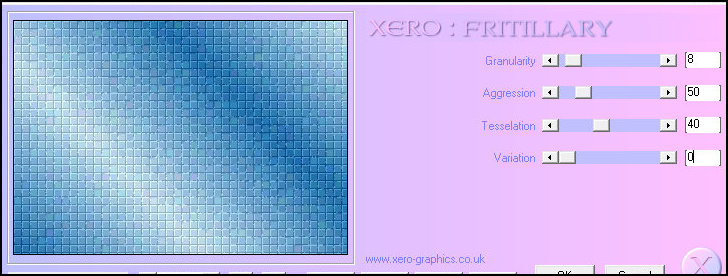
Effects / plugins / Xero / Fritillary
[8 50 40 0]
Adjust/Sharpness/sharpen
Effects/plugins/simple/diamonds
Effects / plugins / Simple / Zoom Out and Flip
Select the Merged layer (from the selection)
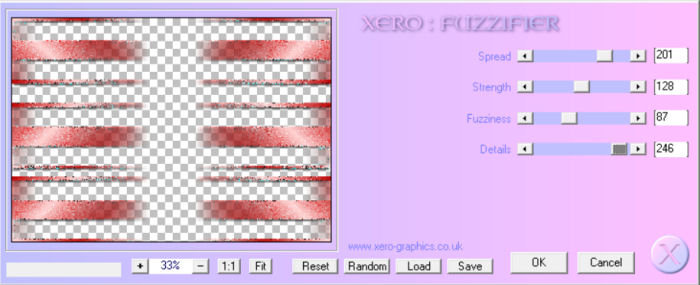
Effects / plugins / Xero / Fuzzifier - apply 3 times
[201 128 87 246]
Note: My version of the Xero plugin is different
from the author's version. For this reason, while the author's
version has 4 items to be configured, mine only has 3. Even so, the
effect didn't work in my version, even though I applied it 3 times.
I put the print of both versions to configure

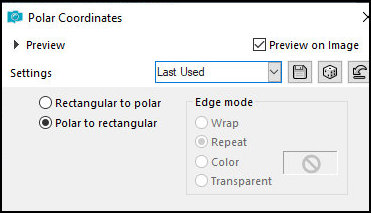
Effects / distortion Effects / polar Coordinates - Apply 2 times
[Polar or rectangular marked]
Layers / Properties / blend Mode: Dodge
Add new layer
Paint with light color
Layers / New Mask Layer / From Image / Mask [NarahsMasks_1729]
Merge Group
Image/resize: 120% - All layers unchecked
Layers / Arrange / Move down
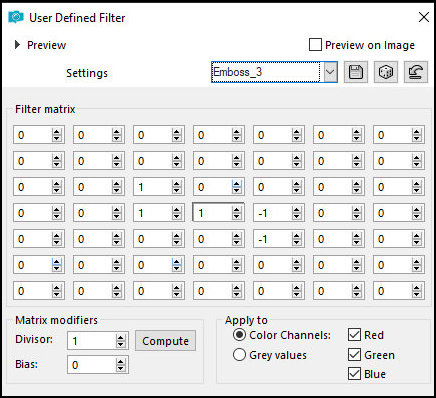
Effects / user defined filter / emboss 3
Activate the top layer
Copy the tube character and paste as a new layer
Resize if necessary
Position as you see fit
Drop Shadow of your choice
Image / Add borders / symmetric marked / 2px / dark color
Image / Add borders / symmetric marked / 2px / light color
Image / Add borders / symmetric marked / 2px / dark color
Image / Add borders / symmetric marked / 40px / color white or
different from the previous one
Select this 40px border with the Magic wand (tolerance/feather=0)
Paint with the gradient
Effects / Plugins / Xero / Artworks same as above, but only apply
once
Effects / plugins / Xero / Fritillary same as above

Selections / invert
Drop shadow: 15 15 60 15 black
Drop Shadow: -15 -15 60 15 black
Select none
Copy the tube deco from the material and paste it as a new layer
Colorize according to your colors
Image / Add borders / symmetric marked / 2px / white or as you
prefer
Put your signature
Merge All
Save as jpeg
*
|
Value the translator’s work. In
addition to the link to the original work, also include
the translation link. Thank you very much!
Valorar el trabajo del traductor.
Además del enlace a la obra original, incluya también el
enlace a la traducción. ¡Muchas gracias! |
Tutorial traduzido em
*
 |