|

|
Tutorial de angela das Graças
Link tutorial original:
michele
|
| Tubes Principais:
VM Tubes
|
| Link material:

|
| Plugins:
Phpshares-hdj2 / Michele
Italian Editors Effect / Effetto Fantasma
|
SCRIPT
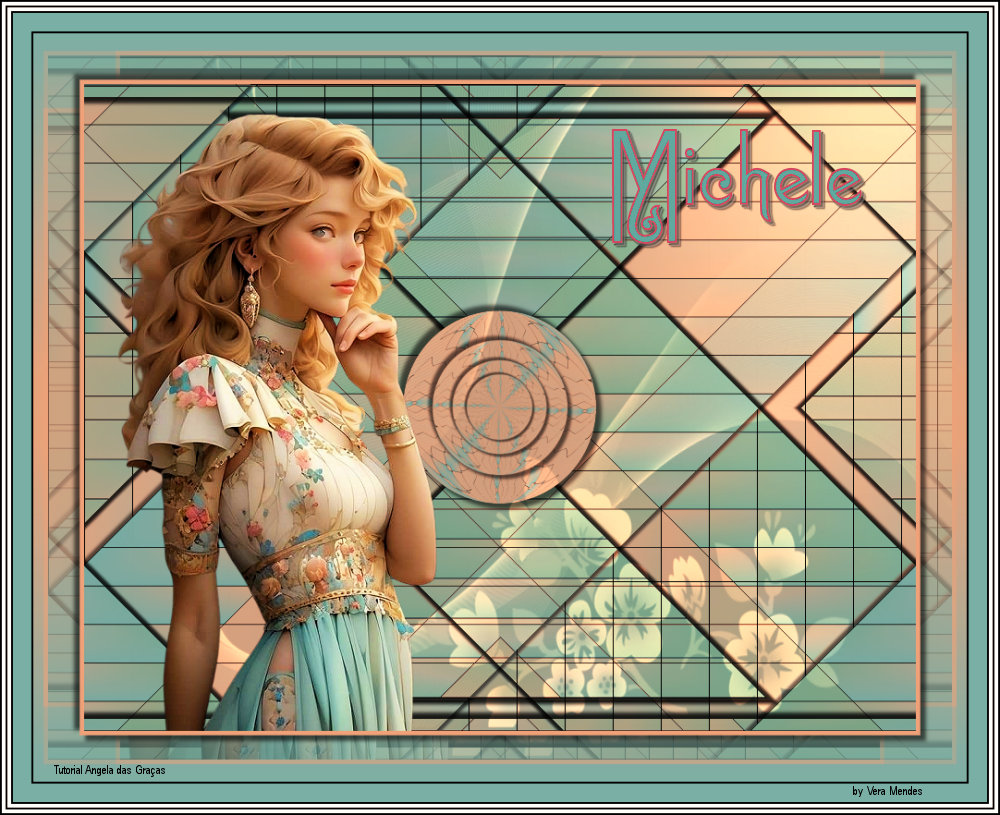
01. Open PSP, Tube and Mask
02. Open a new transparent image measuring 900 x 700px
Choose two colors for your tube: the dark color for the foreground
and the light color for the background
Paint with this Linear gradient
Angle=0 / Repeats=1 - invert unchecked
03. Effects / Plug-in / Phpshares-hdj2 / Michele as in Print:
15 98
04. Layers/Duplicate
Image/Resize: 80% - all layers unchecked
05. Drop shadow: 6 6 60 6 black
Repeat Drop Shadow with negative H and V
06. Image / Free rotate / Left/90
07. Effects / Geometric Effects / Skew
horizontal 45 wrap
08. Layers/Duplicate
Image / Mirror / Mirror Horizontal
Layers / Properties / blend Mode: Darken
09. Layers / duplicate
Effects / Reflection Effects / Kaleidoscope
80 15 0 2 2 0 0 wrap
10. Activate the Raster 1 layer
Layers/Duplicate
Layers / Arrange / Bring to top
11.Effects / Reflection Effects / Kaleidoscope
80 89 117 4 8 5 40 wrap
12.Effects / Geometric Effects / Circle / Transparent
13. Image/resize: 30%
Drop Shadow same as above
14.Layers/Duplicate
Image/Resize: 70% - all layers unchecked
Repeat these two steps 3 times
15. Layers / New Raster Layer
Paint with light color
16.Layers / New Mask Layer / From Image / Mask [EF_Mask115]
17. Merge Group
18. Effects / Image Effects / offset
120/0
19. Layers / Properties / blend Mode: Dodge
20.Copy the main tube
Paste as new layer no work
Resize if necessary
Drop Shadow of your choice
21.Image/Add Borders: Symmetric Marked/5 pixels/Light Color
22.Image/Add Borders: Symmetric Marked/50 pixels/Any color
23.Select with Magic Wand (Tolerance and Feather 0)
Paint with the Start Gradient.
24. Effects / Plug-in / Italian Editors Effect / Effetto Fantasma
20/20:
25.Selections/Invert
Drop shadow: 6 6 60 6 black
Repeat Drop Shadow with negative H and V
Select none
26.Image/Add Borders: Symmetric Marked/2 Pixels/Black Color
27.Image/Add Borders: Symmetric Marked/20 pixels/Dark Color
28.Image/Add Borders: Symmetric Marked/2 Pixels/Black Color
29.Image/Add Borders: Symmetric Marked/4 pixels/White Color
30.Image/Add Borders: Symmetric Marked/2 Pixels/Black Color
31.Image/Add Borders: Symmetric Marked/4 pixels/White Color
32.Image/Add Borders: Symmetric Marked/2 Pixels/Black Color
33.Copy the michele-text and paste it as a new layer
Colorize if necessary
Position according to the model or as desired
34. Put your signature
Image / Resize: width: 1000px - all layers checked
Save as jpeg
Tutorial traduzido em 18/10/2023
*
 |


