|
Tutorial de Alessandra
Link tutorial original:
Eternal
|
| Tubes Principais:
VM Tubes
|
| Link material:


|
| Plugins: Eye Candy 7 / Rust
ou
Alien Skin Eye Candy5 / Nature / Rust (nas mesmas
configurações do Print colocando Randon Seed 0
|
It will be necessary:
1 female tube
1 male tube
1 mixed couple tube |
SCRIPT
01. Open the tube on the PSP
02. Copy and close the original
03. Paste as new image
04. Choose two colors from the tube. A dark color for the
foreground and a light color for the background
05. Prepare a Sunburst gradient
repeats=9 / invert unchecked / center point= 100/50
focal point = 50/50
Link unchecked
06. Open a new transparent image measuring 800 x 600px
07. Paint with the gradient
08. Layers / duplicate
09. Image / Mirror / Mirror Horizontal
10. Layers / Properties / Blend Mode: lighten
11. Merge down
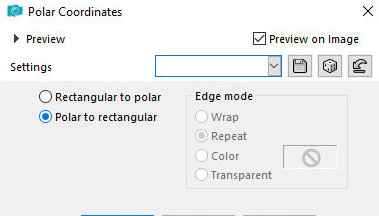
12. Effects / Distortion Effects / Polar Coordinates / Polar to
Rectangular
13. Adjust / sharpness / Sharpen More
Duplicate this image (shift+D) and minimize it, we will use it
later
Activate the other image
14. Layers / New Raster Layer
Paint with light color
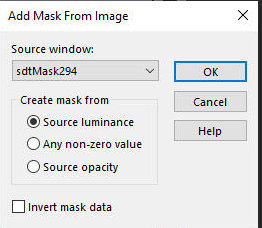
15. Layers / New Mask Layer /From Image / Mask [sdtMask294]
Effects / Edge Effects / Enhance More
16. Merge Group
17. Drop shadow: 5 5 50 0 black
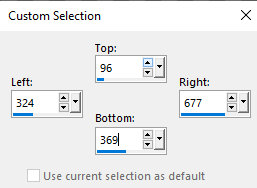
18. Activate the Selection Tool / Custom
96 324 677 369
19. Layers / New Raster Layer
20. Copy the mixed tube
21. Paste into selection
22. Layers / Properties / blend Mode: Luminance
23. Activate the Group-Raster 2 layer
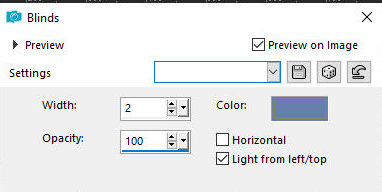
24. Effects / Texture Effects / Blinds
2 100 color dark/horizontal unchecked/light from left/top
checked
25. Select none
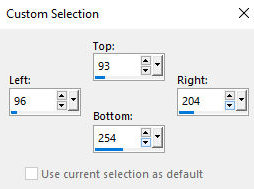
26. Activate the Selection Tool/ Custom Selection
93 96 204 254
27. Layers / New Raster Layer
28. Copy women's tube
29. Paste into selection
30. Activate the Raster 2 layer group
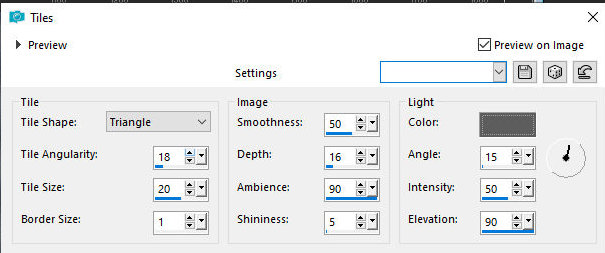
31. Effects / Texture Effects / Tiles
32. Select none
33. Activate the Raster 3 layer
34. Drop shadow: 0 1 50 10 black
35. Activate the Selection Tool / custom Selection
351 95 202 512
36. Add a new layer
37. Copy man tube
38. Paste into selection
39. Activate the Group-Raster 2 layer
40. Effects / Texture Effects / Tiles same as above
41. Select none
42. Activate layer 4
43. Drop shadow: 0 1 50 10 black
44. Image / Add borders / symmetric marked / 3px / dark color
45. Image / Add borders / symmetric marked / 50px / light color
46. Select this 50px border with the Magic Wand (tolerance/feather=0)
47. Activate the image that was copied and reserved in item 13
48. Copy this image
49. Paste into selection
50. Layers / Promote Background Layer
51. Selections / Promote selection to layer
52. Image / Mirror / Mirror Vertical
53. Select none
54. Layers / Properties / blend Mode: Lighten
55. Merge down
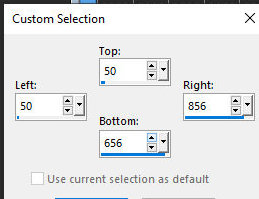
56. Activate the Selection Tool / custom Selection
50 50 856 656
57. Selections / Invert
58. Effects / Plugins / Eye Candy 7 /Nature / Rust (Or Eye
Candy5 / Nature / Rust - random Seed=0)
59. Drop shadow: 10 10 50 10 black
Repeat with negative H and V
Select none
60. Put your signature
Save as jpeg