|

|
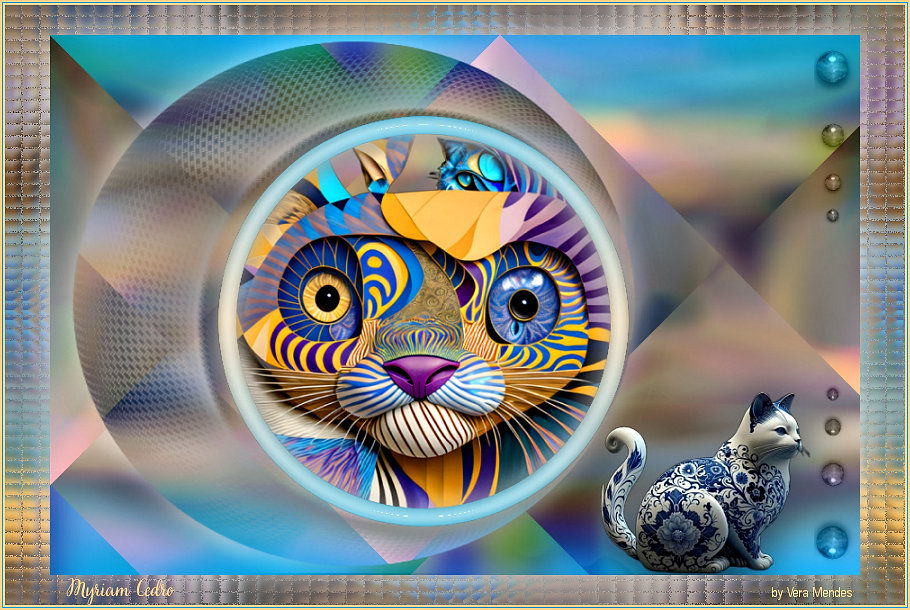
Tutorial de Myriam Cedro
Link tutorial original:
Eterea
|
| Tubes Principais:
VM Tubes
Tube made from an image created by Didier Lourenço
using AI |
| Link material:

|
| Plugins: Mehdi / Sorting Tiles
Eye Candy 5: Impact / Glass
|
SCRIPT
01. Choose two colors for your tube: a light one for the foreground
and a dark one for the background
Colors used in the original version:
Foreground: #d1b3e9
background: #64309b
02. Prepare a Linear gradient
Angle=0 / repeats=1 / INVERT MARKED
03. Open a new transparent image measuring 900 x 600px
Paint with the gradient
Selections / Select All
04. Copy the main tube
Paste into selection
Select none
05. Effects / Image Effects / Seamless Tiling / Side by Side
06. Layers/ Duplicate
Image / Mirror / Mirror Horizontal
Layers/Properties/Opacity: 50%
Merge down
07.Adjust/Blur/Gaussian blur: 15
08. Effects / Plugins / Mehdi / Sorting Tiles
09. Layers/Duplicate
Image / Mirror / Mirror Vertical
10. Layers / New mask Layer / From Image / Mask [Narah_mask_0308]
11. Merge Group
Layers/duplicate
Merge down
12. Drop Shadow: 0 0 50 50 white
Align the formed layer with the left mask of your work: Align /
objects / left
13. Layers / New Raster Layer
Activate the Selection Tool / In Selection Type select the Circle/
Click inside the circle formed by the mask and draw a circle
14. Layers / New Raster Layer
15. Copy the main tube
Paste as new layer
Position the tube on top of the selection
In the original version, the author resized the tube she used by 80%
and moved it to the center of the circle.
You must resize according to your tube
16. Selections/Invert
Press Delete on your keyboard
Selections / Invert again
17. Selections / Modify / Select selection borders
ouside 20
Fill the selection with the initial gradient
18. Effects / Plugins / Eye Candy 5: Impact / Glass
19. Selections / Promote Selection to layer
Layers / Properties / blend Mode: Screen
Drop Shadow same as above
20. Merge down (apply 2 times)
Select none
21. Copy the Deco tube 1
Paste as new layer
Position according to the model
Layers / Properties / Blend Mode: Luminance (L)
22. Layers/Duplicate
Image / Mirror / Mirror Vertical
Merge down
23. Copy the decorative tube
Position according to the model
Layers/Duplicate
24. Activate the original tube layer
Adjust/blur/Gaussian blur: 25
25. Merge All
Layers/Duplicate
26. Image / Resize: 90% - All layers unchecked
Drop shadow: 0 0 50 50 white
27. Activate the background layer
Adjust / Blur / Gaussian Blur; 25
28. Effects / Image Effects / Seamless Tiling - Default
Effects / Texture Effects / Mosaic Glass
29. Image / Add borders / symmetric marked / 2px / foreground color
30. Image / Add borders / symmetric marked / 1px / background color
31. Image / Add borders / symmetric marked / 2px / foreground color
32. Put your signature
33. Save as jpeg
Tutorial traduzido em 28/10/2023
*
 |


