|


This tutorial is by Natália Raposo, whom I thank
for letting me translate her tutorials.
*
Original here
*
Tubes

*
Material

*
Plugins
LenK's Palmyre
LenK's Mayra
Lenk's Frederieck
You can find these plugins on the websites of:
Renée
Cloclo
ROTEIRO
1.
Open the mask on the psp and minimize
Choose two colors from your tubes and place the dark color in the
foreground and the light color in the background.
2.
Prepare a Linear gradient

Open a new 1000x700px transparent image
3.
Paint the image with the gradient
Effects / Edge Effects / Enhance
4.
Selections / Select all
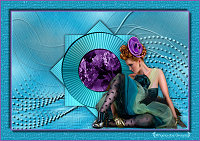
Copy the tube character [3979 - woman - lb tubes] and paste it into
the selection
5.
Select none
Effects / Image Effects / Seamless Tiling - default

6.
Adjust / Blur / Gaussian Blur=15

Effects / plugins / L&K's / L&K's Palmyre

7.
Effects / plugins / L&K's / L&K's Mayra

Effects / Reflection Effects / Rotating Mirror - Default

8.
Layers / Duplicate
Image / Resize: 80% - all layers unchecked
9.
Effects / Distortion Effects / Lens Distortion

Effects / Distortion Effects / polar Coordinates

10.
Layers / Duplicate
Image / Mirror / Mirror Vertical
11.
Merge down
Add new layer
12.
Paint with background color
Layers / New mask layer / From Image / Mask [ef_mask_26] - INVERT
MARKED

13.
Merge Group
Layers / Properties / blend mode: Soft Light
14.
Adjust / Sharpness / Sharpen More
Copy the tube character [3979 - woman - lb tubes] and paste it as a
new layer
15.
Make any adjustments you think necessary (resize/sharpen/drop shadow
etc.)
16.
Image / Add borders / 2px / background color
Copy (it will remain in memory)
Image / Add borders / 4px / foreground color
Image / Add borders / 25px / background color
Image / Add borders / 4px / foreground color
17.
Selections / Select All
Image / Add borders / 50px / any color
18.
Selections / invert
Paste the image copied above into the selection
19.
Adjust / Blur / Gaussian blur=20

Effects / plugins / L&K's / L&K's Frederieck

20.
Effects / Plugins / L&K's / L&K's Palmyre
Select none
21.
Image / Add borders / 2px / background color
Copy the tube deco [nrb_art_deco_84] and paste it as a new layer
22.
Activate the Pick Tool and set: X=82 / Y=148

Layers / Duplicate
23.
Image / Mirror / Mirror Horizontal(Mirror)
Layers / Duplicate
Image / Mirror / Mirror Vertical(flip)
24.
Layers / Duplicate
Image / Mirror / Mirror Horizontal (Mirror)
25.
Copy the deco[nrb_art_deco_85] tube and paste it as a new layer
Activate the Pick Tool and set: X=12 / Y=16

26.
Layers / Duplicate
Image / Mirror / Mirror Horizontal
27.
Image / Mirror / MIrror Vertical
Copy the tube deco [nrb_art_deco_85] and paste it as a new layer
28.
Position on the sides of the mask according to the template
Layers / Duplicate
Image / Mirror / Horizontal mirror
Copy the deco tube [nrb_art_deco_86] and paste it as a new layer
29.
Activate the Pick Tool and set: X=1039 / Y=13

Layers / Duplicate
30.
Image / Mirror / Mirror Vertical
Image / Mirror / Mirror Horizontal
31.
Copy the tube text [nrb_art_texto_estela] and paste it as a new
layer
Position according to the template or as you prefer
32.
Merge visible
Image / Resize: width=1000px
Adjust / Sharpness / Sharpen
Add signatures
Merge all
Save as jpeg
* Tutorial traduzido em
20/08/24
*
 |