|

|
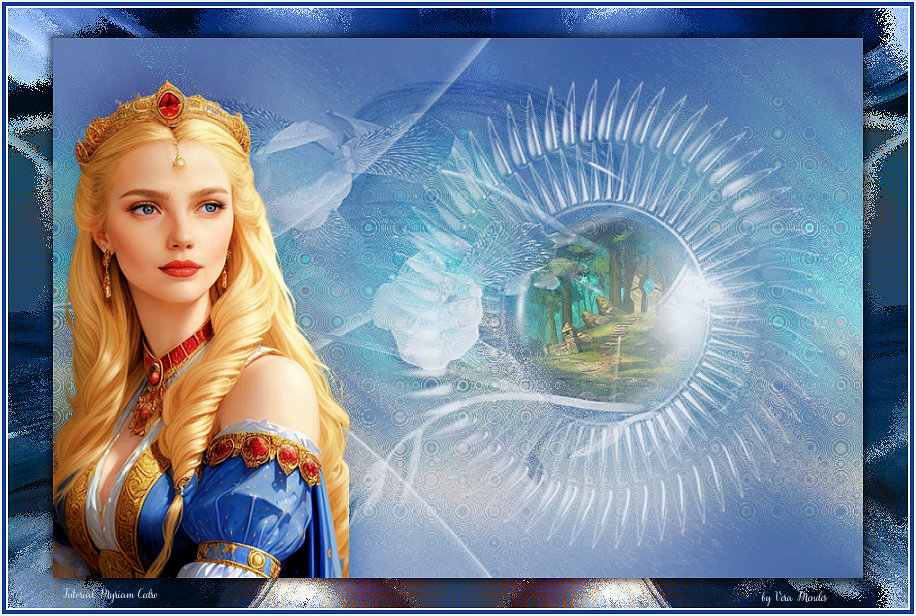
Tutorial de Myriam Cedro
Link tutorial original:
druidesa
|
| Tubes Principais:
VM Tubes
|
| Link material:

|
| Plugins: Fun House
Italian Editors Effect
Ap Lines / SilverLining
|
SCRIPT
01 - Open the PSP, the Tubes and the mask
Duplicate images and zip originals
Save the selection [MC_druida_sel] in the "SELECTIONS" folder on
your PSP
Remove two colors from the Tube
Colors in this Tutorial:
Foreground: #c4c8abf
Background: #495957
02 - Open a transparent image
(NT. I opened the image with 900 x 600px)
Paint with dark color - #495957
Layers/New Raster Layer
Paint with light color - #c4c8abf
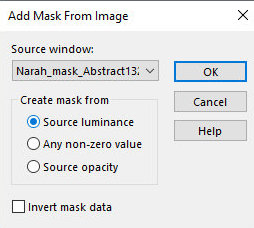
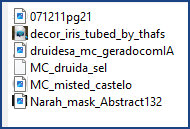
Layers / New Mask Layer:/ From image / Mask [Narah_mask_Abstract132]
03 - Layers / Merge / Merge Group
Layers/New Raster Layer
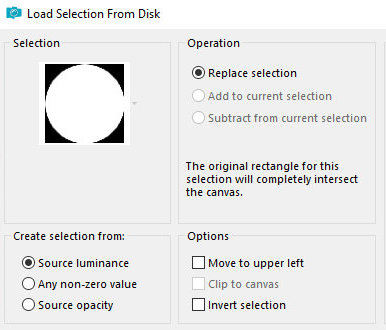
04 - Selections / Load selection from disk / Selections [MC_druida_sel]
05 - Open the Misted Paisagem tube [MC_misted_castelo] / Edit / Copy
Return to your work
Edit / Paste / Paste in to Selection
Layers / Arrange / Move Down
Selections/Select None
Adjust / Sharpness / Sharpen
06 - Position yourself on the Top Layer
Layers/New Raster Layer
Paint with light color
07 - Open the Floral Tube [decor_iris_tubed_by_thafs]
Copy and paste as new image
08 - Return to your work
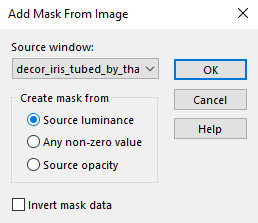
Layers / New Mask Layer/ From image / Mask [decor_iris_tubed_by_thafs]
The image created [decor_iris_tubed_by_thafs] we will use it as if
it were a mask
Layers/Merge/Merge Group
09 - Image / Resize / 125% All Layers UNCHECKED
Drop Shadow: 0010050black
10 - Position yourself on the Background layer
Layers/New Raster Layer
Selections / Select All
Copy the tube misted landscape [MC_misted_castelo]
Paste into selection
Select None
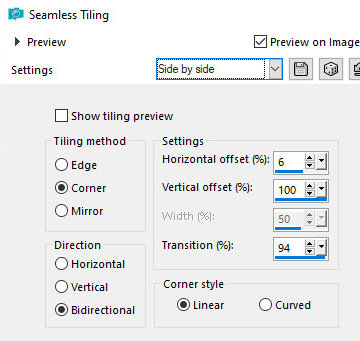
11 - Effects / Image Effects / Seamless Tiling / Side by side
N.T.: if you don't have this preset, just enter the print
configuration
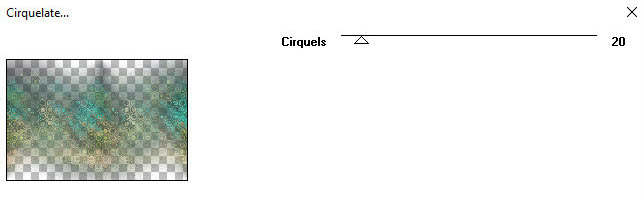
12 - Effects / Plug-ins / Fun House / Cirquelate /
Cirquels / 20
13 - Layers / Properties / blend Mode: Dodge or
another that highlights the effect
In the second example the author used Overlay
Note - This Layer may present subtle differences from the model if
you are using a different Misted Landscape than the one provided
with the Material
Merge Visible
14 - Copy the Main Tube
Paste as new layer
Resize if necessary
If using the material, reduce by 40%
Position on the left, below according to the model
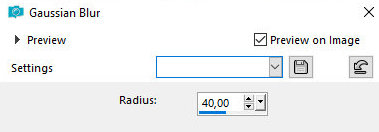
15 - Layers / Duplicate
Adjust/Blur/Gaussian Blur:40
16 - Layers / Arrange / Move Down
Layers / Properties / blend Mode: Burn / Opacity: 100% (if you use
another tube, change the blend mode and opacity accordingly
Merge All
17 - Layers / Duplicate
Image / Resize: 90% - all layers unchecked
18 - Position yourself on the Background Layer
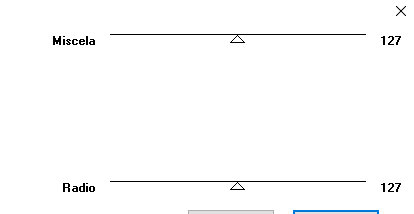
Effects / Italian Editors Effect / Picture in Picture
127 / 127
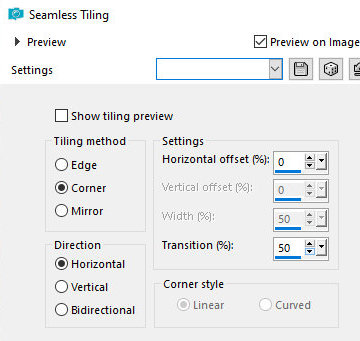
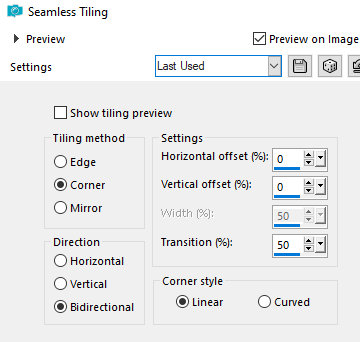
19 - Effects / Image Effects / Seamless Tiling
corner-horizontal 0 50
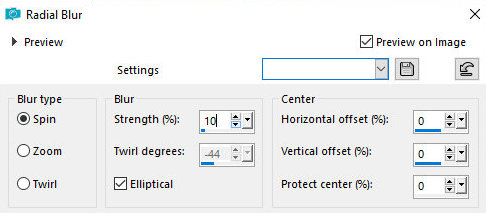
20 - Adjust / Blur / Radial Blur:
spin 10 elliptical marked 0 0 0
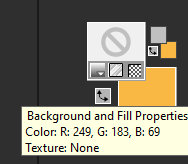
21 - Memorize/Note down the RGB values of the
chosen light color to use in the next step
To find out these values, click on your color in the Materials
Palette to view the values
If you have a more current version of the PSP, simply position the
mouse over the color and a window will appear with the values
Or, click on the color in the foreground or
background, when the window opens, click on the slider and write
down the R, G or B values.
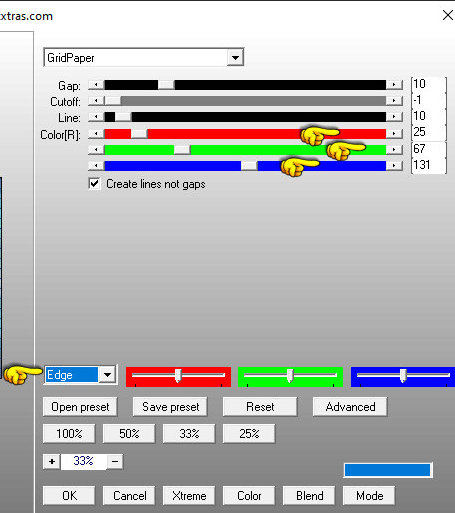
22 - Effects / Plug-ins / Ap Lines / SilverLining
GridPaper 10 -1 10 196 200 171 - edge selected
Note: these last 3 values, you must replace with the RGB values you
found
23 - Effects / Plug-ins / Fun House / Cirquelate
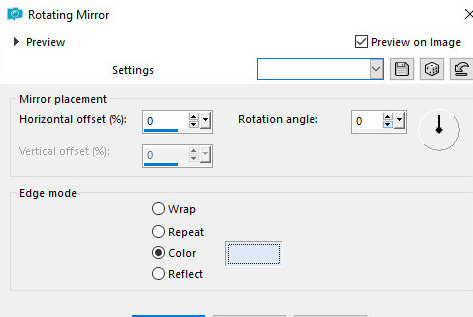
Effects / Reflections Effects / Rotating Mirror
0 0 color(light color)
24 - Activate the top layer
Drop Shadow: 4 4 50 10 black
25 - Repeat Drop Shadow with negative H and V
26 - Activate the background layer
Layers/New Raster Layer
Select All
27 - Activate Deco [071211pg21]
Copy and paste into selection
Selections/Select None
28 - Effects /Image Effects / Seamless Tiling / Default
29 - Layers / Duplicate
Image / Mirror / Mirror Horizontal
Layers / Merge / Merge Down
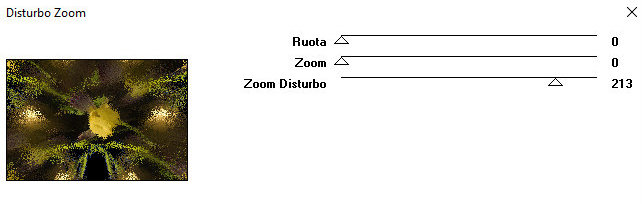
30 - Effects / Plug-ins / Italian Editors Effects / Disturbo Zoom
0 0 213
Note - This Layer may present subtle differences
in relation to the model if you are using a different Deco than the
one provided with the Material
31 - Layers / Properties / blend Mode: Luminance (L)
32 - Image / Add Borders / Symmetric Tagged:
2px light color
4px dark color
2px light color
33 - Adjust Sharpness / Sharpen
34 - Put your signature
Save as jpeg
Tutorial traduzido em 20/10/2023
*
 |