|

|
Tutorial de Angela das Graças
Link tutorial original:
Chavela
|
| Tubes Principais:
VM Tubes
|
| Link material:


|
| Plugins: Unlimited 2.0 / Bkg
Designer sf10I / Blinds Vertical
Unlimited 2.0 / Bkg Designer sf10I / Cirquelate
Unlimited 2.0 / Bkg Designer sf10I / Crosstitch
Ap Lines / SilverLining
|
SCRIPT
01- Open the PSP and the Tubes
02- Choose two colors from the main Tube.
Save the [hartjes] texture in the Textures folder on the PSP
Put the dark color in the Foreground and the light color in the
Background
Prepare a Linear Gradient / Angel 0 / Repeats 1 / Invert unchecked
03- Open a new transparent image with 1000 X 700 Pxs.
Paint with dark color
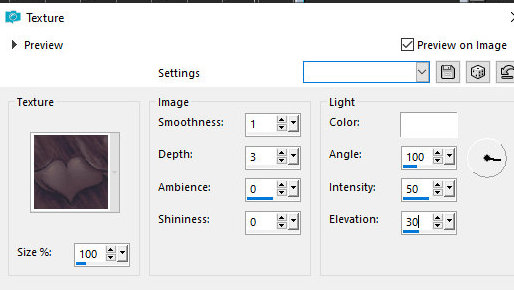
04- Effects/ Texture Effects/ Texture - [hartjes] as in the print:
100 1 3 0 0 white 100 50 30
05- Effects / Plug-in/ Unlimited 2.0 / Bkg Designer sf10 I / Blinds
Vertical as in the print:
4 255 255 255 0000
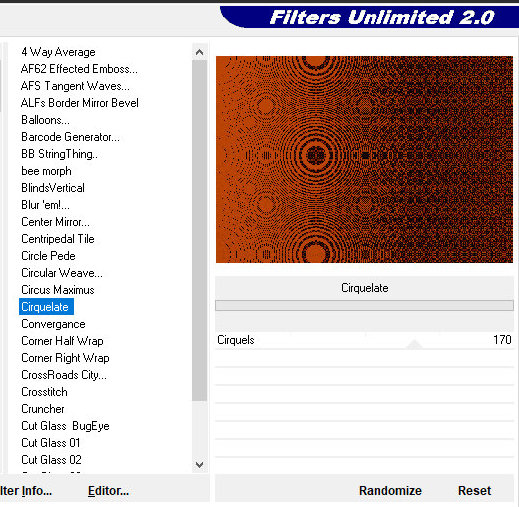
06- Effects / Plug-in/ Unlimited 2.0 / Bkg Designer sf10 I /
Cirquelate as in the print:
170 0000000
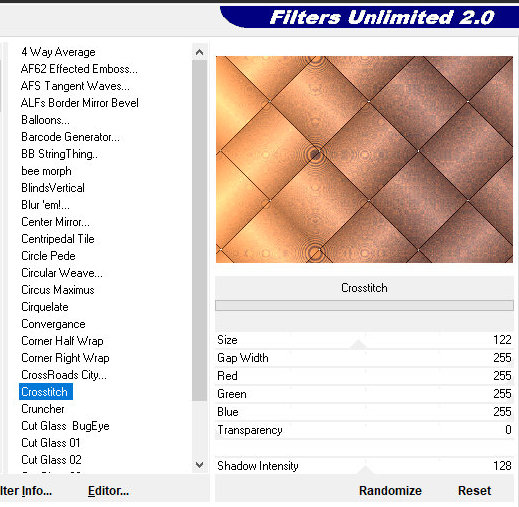
06b- Effects / Plug-in/ Unlimited 2.0 / Bkg Designer sf10I /
Crosstitch as in the print:
122 255 255 255 255 0
07- Layers / Duplicate
Image / Mirror / MIrror Horizontal (Mirror)
08- Layers / Properties / Blend Mode:Overlay
09- Layers / Merge / Merge Visible
10- If you prefer, colorize it so that it stays in the color used
initially
11- Copy the Deco [angelagmn_deco_chavela]
12- Paste the New Layer (colorize according to the colors used)
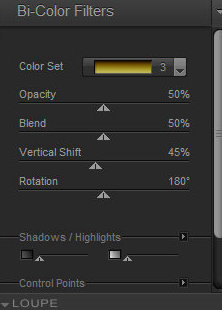
13- Effects / Plug-in / Nik Software / Color Efex Pro 3.0 / Bi-Color
Filters (choose from the Color Set what you like most)
15- Drop Shadow: 6 / 6 / 60 / 6 / Black
Repeat Drop Shadow with negative V and H
18- Copy the tube misted landscape
Paste as new layer
17- Layers / Arrange / Move Down
19- Position it inside the square on the right side, resize if
necessary and delete anything outside the frame
20- Layers / Duplicate
Image / Mirror / Mirror Horizontal
Activate the Top Layer
21- Copy the main Tube
Paste as new layer
Position as you see fit
22- Drop Shadow: 0 / 0 / 60 / 30 black or as you prefer
23- Image / Add Borders / Symmetric marked / 2px / black color
24- Image / Add Borders / Symmetric marked / 40px / any color
different from the previous one
25- With the Magic Wand Tolerance and Feather 0, select the edge and
paint with the Initial Gradient
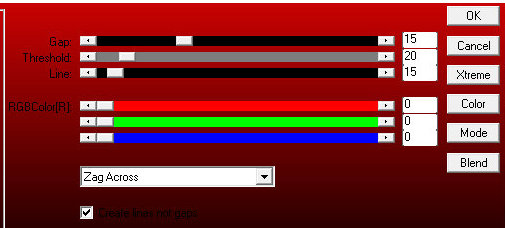
26- Effects / Plug-in / Ap Lines / SilverLining - Preset [zag across]
15 / 20 / 15 / 0 / 0 / 0
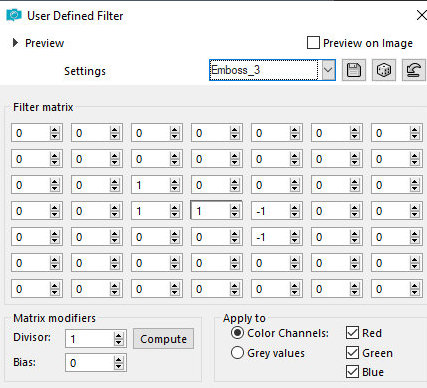
27- Effects / User Defined Filter / Emboss 3
28- Selections / Invert
29-Drop Shadow: 10 / 10 / 60 / 10 / Black
Repeat Drop Shadow with negative V and H
30- Selections / Select None.
31- Image / Add Borders / Symmetric marked / 2px / black
32- Copy the chavela-text
Paste as new layer
Colorize accordingly
33- Merge All
34- Image / Resize: width: 1000px - all layers checked
35 - Put your signature
Save as jpeg
Tutorial traduzido em 18/10/2023
*

 |