|


|
Tutorial de alexandra
Link tutorial original:
Aceitação
|
| Tubes Principais:
VM Tubes
|
| Link material:

|
| Plugins:
Simple / Pizza Slice Mirror
Simple / 4 Way Average
Filters Unlimited 2.0 / &<Bkg Designer sf10 I> /
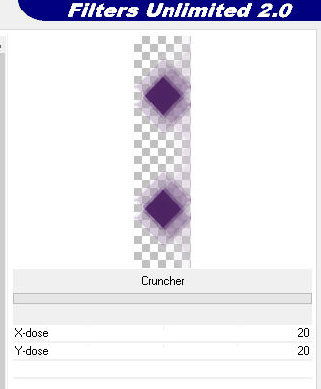
Cruncher
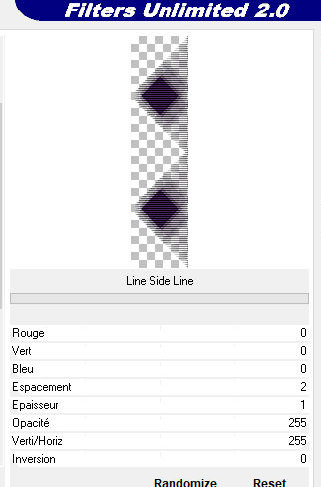
Filters Unlimited 2.0 / &<Bkg Designer sf10 II> / Line
Side Line
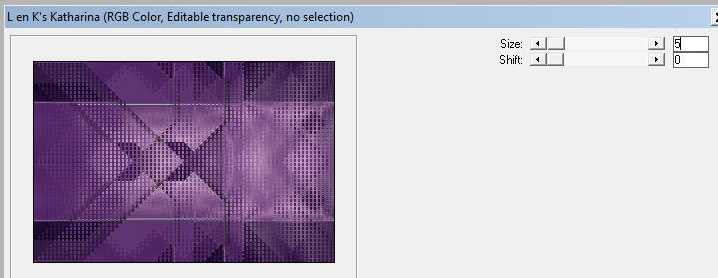
L em K landksiteofwonders / L en K’s Katharina
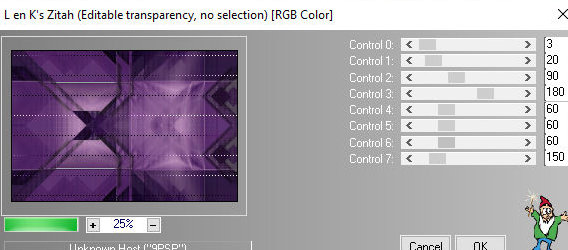
L em K landksiteofwonders / L en K’s Zitah
|
|
Save the selections to the PSP selections folder
You will need:
1 tube character
1 misted and eye or look |
SCRIPT
01. Open the material on the PSP / Duplicate (shift+d)
/ Close the originals
02. Choose two colors for your tube: a dark one for the foreground
and a light one for the background
03. Open a new image with 900 x 600px
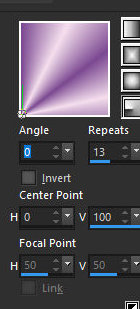
04. Prepare a Radial gradient
Angle=0 / repeats=13 / invert unchecked / Center point 0/100
05. Paint the image with this gradient
06. Effects / Edge Effects / Enhance More
07. Effects / Plugins / Simple / pizza Slice Mirror
Repeat this effect one more time
08. Layers/Duplicate
09. Image / Mirror / Mirror Horizontal
10. Layers / Properties / blend Mode: Lighten
11. Merge down
12. Layers/Duplicate
13. Image / Mirror / Mirror Vertical
14. Layers / Properties / blend Mode: Multiply
15. Merge Down
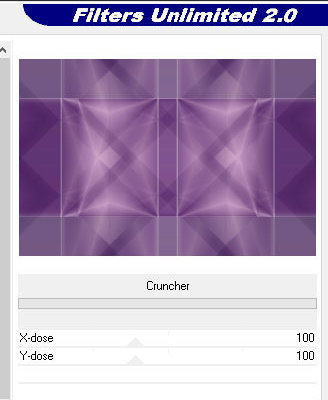
16. Effects / Plugins / Unlimited 2 / BKG Designer sf10 I / Cruncher
100/100
17. Effects / Plugins / Simple / Pizza Slice Mirror
18. Layers/Duplicate
19. Umage/Mirror/Mirror Vertical
20. Layers / Properties / blend Mode: Darken
21. Merge Down
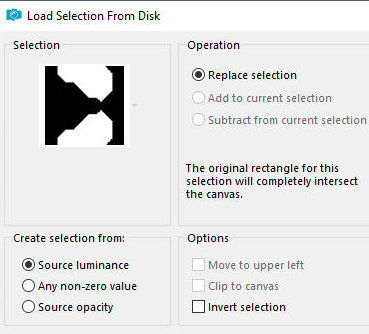
22. selections / Load selection from disk / Selection [leteia_aceitacao]
23. Effects / plugins / Simple / Pizza Slice Mirror
24. Effects / Edge effects / Enhance More
25. Drop Shadow: 0 20 40 10 black
Repeat Drop shadow with negative V and H
26. Select none
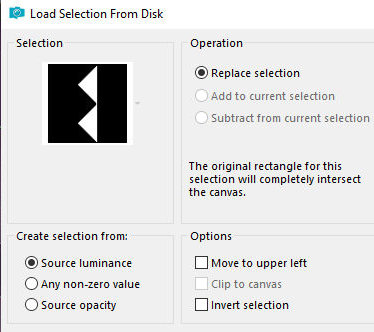
27. Selections / Load selection fromdisk / Selections
[leteia_aceitacao1]
28. Selections / Promote selection to layer
29. Effects / Plugins / Simple / 4Way Average
30. Effects / Plugins / unlimited 2 / BKG Designer sf10 I / Cruncher
20 / 20
31. Effects / Edge Effects / Enhance More
32. Effects / Plugins / Unlimited 2.0 / &<Bkg Designer sf10 II> /
Line Side Line:
0 / 0 / 0 / 2 / 1 / 255 / 255 / 0
Apply this effect once again
33. Drop Shadow: 0 / -15 / 40 / 10 / #000000
34. Select None
35. Merge Down
36. Layers/Duplicate
37. Effects / Plugins / L on Klandksiteofwonders / L on K’s
Katharina: 5 / 0
38 Layers / Properties / Blend Mode: Darken
39. Adjust / Sharpness / Sharpen More
40. Merge Down
41. Effects / Plugins / L in K landksiteofwonders / L in K’s Zitah:
3 / 20 / 90 / 180 / 60 / 60 / 60 / 150
42. Layers / New Raster Alayer
Paint with light color
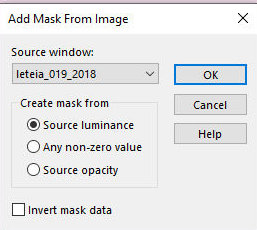
43. Layers / New Mask Layer / From Image / Mask [letéia_019_2018]
44. Merge Group
45. Layers / New Raster Layer
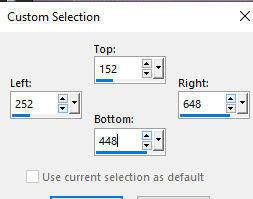
46. Activate the Selection Tool / Custom selection and configure:
152 252 648 448
47. Copy the eye or look tube
Paste into selection
48. Layers / Properties / blend Mode: Luminance (L) / Opacity: 50%
49. Select none
50. Copy the tube character and paste it as a new layer
51. Position on the right side of the tag
52. Resize if necessary to look like the model
53. Layers / Properties / blend Mode; Luminance (L) / Opacity: 50%
54. Paste the tube character again
55. Resize (note the model)
56. Image / Mirror / Mirror Horizontal
57. Position on the left side
58. Drop shadow: 0 15 40 20 black
59. Image / Add borders / symmetric marked / 3px / dark color
60. Image / Add borders / symmetric marked / 60px / light color
61. Copy the deco tube [deco_aceitacao] and paste it as a new layer
62. Layers / Properties / blend Mode: Multiply
63. Image / Add borders / symmetric marked / 3px / dark color
64. Image / Resize: width=900px - all layers checked
65. Put your signature
66. Save as jpeg
Tutorial traduzido em 05/11/2023
*
 |