02 - Faça um Gradiente Linear / Angle/ 0 / Repeat s/ 2 /
Invert desmarcado
03 - Abra uma imagem transparente 800X600 e pinte com esse
Gradiente
04 - Selections / Select all
05 - Edit / Copy no tube. Edit / Paste Into selection
06 - Selections / Select None
07 - Effects / Image Effects / Seamless Tiling / Default
08 - Adjust / Blur / Gaussian Blur / Radius 20,00
09 - Effects / Plugins / VanDerlee / UnPlugged-X /
Distortion / 33% / Deviation 25 / Blackout Border.
Transparency / 0 / Normal
10 - Effects / Plugins / VanDerlee / UnPlugged-X / Wavemaker
/ 33% / 10 / 2 / 0 / 0 / 10 / 2 / 0 /0 . Transparency / 0/
Normal
11 - Effects/ Plugins / RCS Filter Pak 1.0 / RCS Sequins
12 - Effects / Plugins / FM Tile Tools / Blend Emboss /
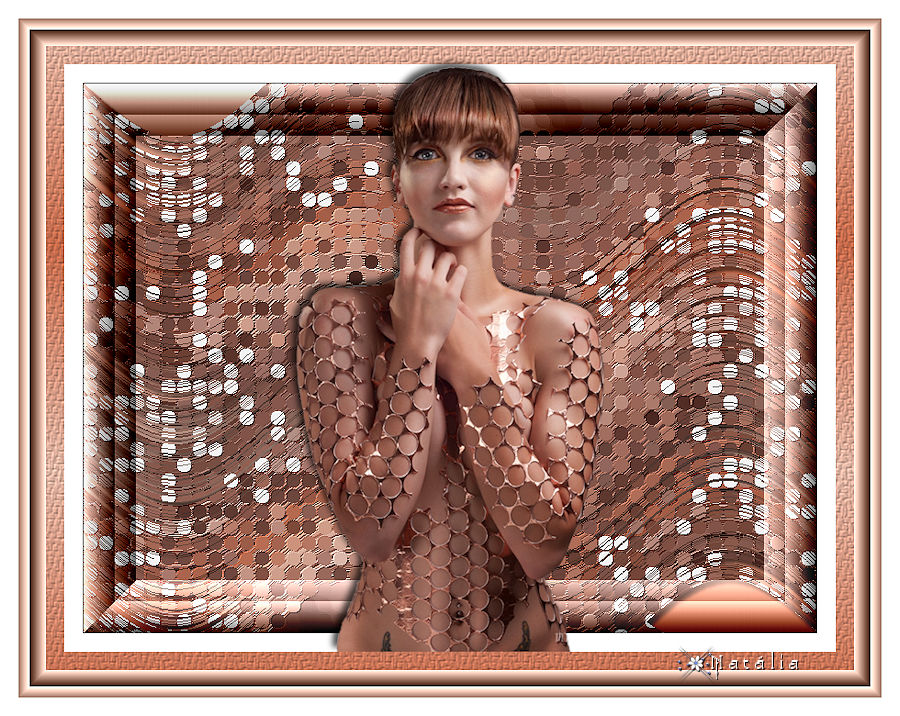
Default
13 - Effects / 3D Effects / Drop Shadow / 5 / 5 / 70 / 5,00.
Preto
14 - Layers / New Raster Layer. Layers / Arrange / Send to
Botton
15 - Pinte com o mesmo Gradiente
16 - Layers / Merge / Merge All (Flatten)
17 - Effects / Plugins / Filters Unlimited 2.0 / Buttons &
Frames / Glass Frame 2 / 50 / 128
18 - Effects / Plugins / Filters Unlimited 2.0 / Buttons &
Frames / Glass Frame 3 / 30 / 105
19 - Image / Add Borders/ Symmetric marcado / 20 / Cor
Branca
20 - Image/ Add Borders/ Symmetric marcado / 50 / Cor
contrastante
21 - Selecione a borda e pinte com o mesmo Gradiente
22 - Effects / Texture Effects / Texture / leather01j_AS /
size 150% / 0 / 1 / 0 / 0 / 315 / 50 / 30 / Cor Branca
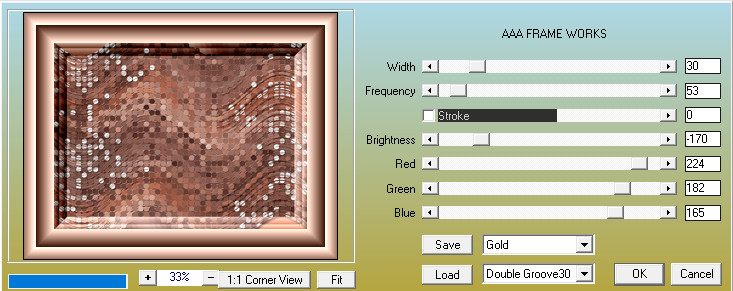
23 - Effects / Plugins / AAA Frames / Frame Works / Preset
Gold / Double Groove30 / RGB da cor clara do Gradiente
24 - Selections / Select None
25 - Edit / Copy no Tube. Edit / Paste as New Layer.
Centralize e ajuste o tamanho, se necessário
26 - Drop Shadow a gosto
27 - Image / Add Borders / Symmetric marcado / 20 / Cor
Branca
28 - Image / Resize / By Pixels / Width / 900. Resize all
layers marcado
29 - Adjust / Sharpness / Sharpen
30 - Assine e salve em Jpeg.
Outro Modelo:
Créditos:
Tubes modelos 1 e 2: Ana Ridzi
Tutorial
criado por Natália Braga em 8 de julho de 2022