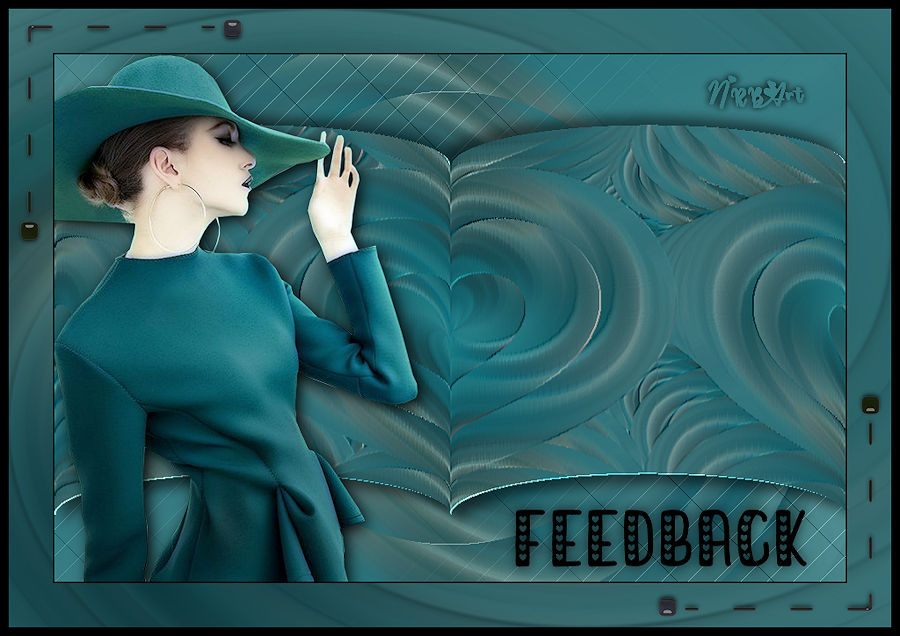
Material:
Tube de personagem
Efeitos do PSP 2020
Plugin Galaxy/ Feedback
Plugin MuRa's Meister/ Copies
Plugin MuRa's Seamless/ Shift at Arch
Plugin Lenklandksiteofwonders/ Lenk's Paris
nrb_art_deco_04
nrb_art_texto_08
selection_feedback

Roteiro:
1 - Abra os materiais no PSP. Coloque a seleção na
pasta Corel Paint Shop Pro / Selections
2 - Retire duas cores e faça um Gradiente Linear / 0
/ 0 / Invert desmarcado
Cor mais escura no Foreground
3 - Abra uma
imagem transparente 900X600. Pinte com o gradiente
Selections / Select all
4 - Edit / Copy no tube. Edit / Paste into Selection.
Selections/ Select none
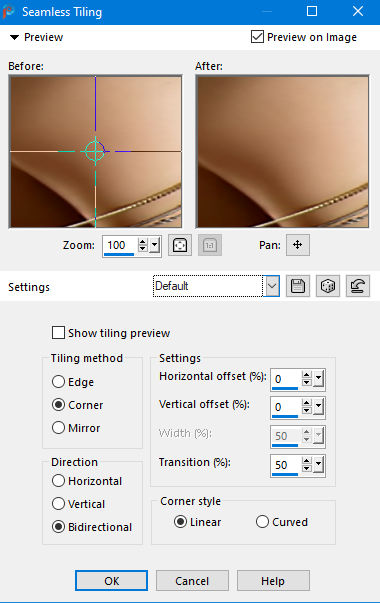
5 - Effects / Image Effects / Seamless Tiling /
Default
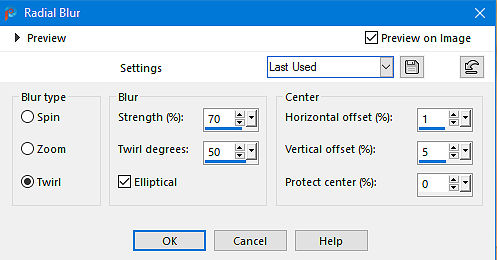
6 - Adjust / Blur / Radial Blur / Twirl / 70 / 50 /
Elliptical marcado / 1 / 5 / 0
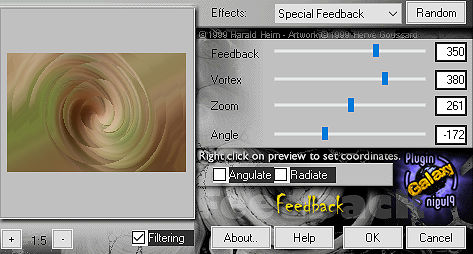
7 - Effects / Plugins / Plugin Galaxy / Feedback /
Effects/ Special Feedback / 350 / 380 / 261 / -172
8 - Layers / Duplicate
Image / Mirror / Horizontal. Image / Mirror
Vertical
9 - Mude o Blend Mode para Darken
Layers / Merge/ Merge Down
10 - Selections / Load/ Save Selection / Load
Selection from Disk / escolha a seleção
selections_feedback
11 -
Selections / Promote Selection to Layer
Selections / Select None
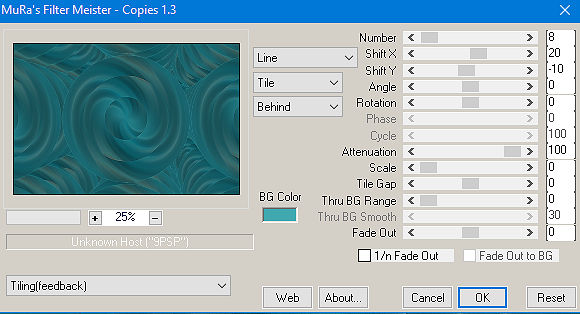
12 - Effects / Plugins / MuRa's Meister / Copies /
Presets/ Tiling [Feedback] /
Line / Tile / Behind / 8 / 20 / -10 / 0 / 0/ 0
/ 100 / 100 / 0 / 0 / 0 / 0
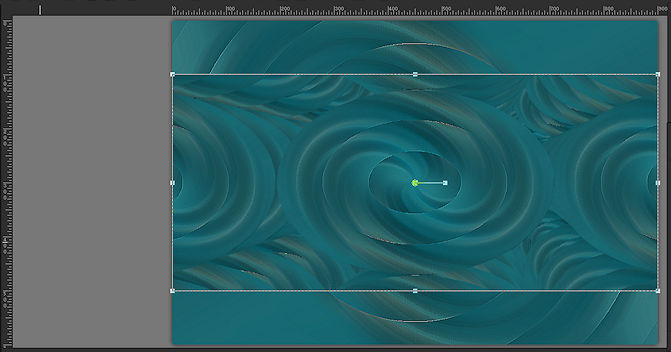
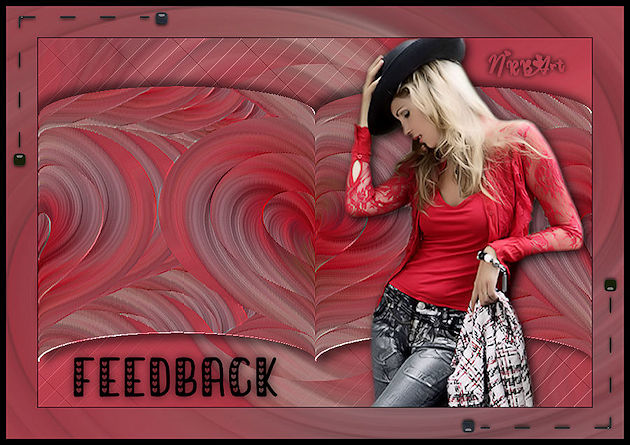
13 - View /
Rulers. Com a ferramenta Pick redimencione a imagem
como no print
Digite a letra M, quando estiver concluído
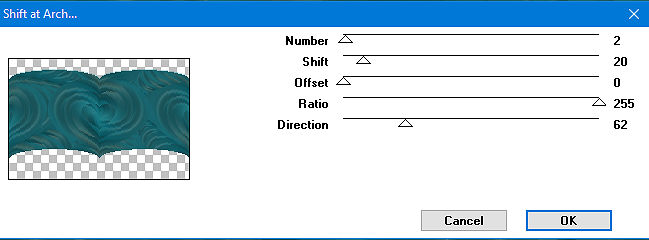
14 - Effects
/ Plugins / MuRa's Seamless / Shift at Arch / 2 / 20
/ 0 / 255 / 62
15 - Effects
/ User Defined Filter / preset Emboss 3
16 - Effects
/ 3D Effects / Drop Shadow / 10 / 10 / 50 / 20,00.
Preto
Repita com os valores Horizontal e Vertical
negativos
17 - Objects / Align / Center in Canvas
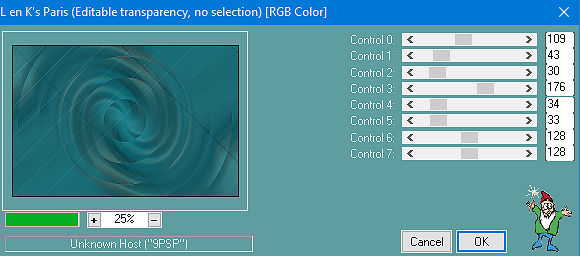
18 -
Selecione a Raster 1 e aplique o plugin
Lenklandksiteofwonders / Lenk's Paris: 109 / 43 / 30
/ 176 / 34 / 33 / 128 /128
Edit / Repeat / Lenk's Paris
19 - Edit /
Copy no Tube. Edit / Paste as New Layer. Layers /
Arrange / Bring to top
Coloque onde desejar e aplique uma sombra a
gosto
20 - Image /
Add borders / 2 / Symmetric marcado / preto
Edit / Copy
21 -
Selections / Select All
Image / Add Borders / 50 / Symmetric marcado /
Preto
22 - Selections/ Invert
Edit / Paste into Selection.
23 - Adjust /
Blur / Radial Blur / Twirl / 70 / 50 / Elliptical
marcado / 1 / 5 / 0
Selections / Select None
24 - Image/
Add borders / 10 / Symmetric marcado / preto
25 - Edit /
Copy no nrb_art_deco_04. Edit / Paste as New Layer
Posicione na borda, como no modelo
26 - Layers /
Duplicate
Image / Mirror Horizontal / Mirror Vertical
27 - Edit /
Copy no nrb_art_texto_08. Edit / Paste as New Layer
Posicione onde desejar
28 - Layers /
Merge/ Merge All
29 - Image / Resize / By Pixels marcado / altere
width para 900 pixels
Resize All Layers marcado
30 - Adjust /
Sharpness / Sharpen
Assine e salve em jpeg
Outro Modelo:
Créditos:
Arte e Formatação: Natália Raposo
Tube1: Callygraphy
Tube2: Claudia Viza
nrb_art_texto_08
nrb_art_deco_04
Tutorial criado por Natália Raposo em Julho
de 2023