
Material
Um
Tube
Efeitos
do PSPXI
Filter
Factory F/Offsetter
Flaming
Pear/Flexy2
Filter
Unlimited 2.0/Special Effects 1/Blur darkness
Filter
Unlimited 2.0/BGK Kaleidoscope/@BlueBerry
Pie.
Mask
113060 long FIBS mask by Shereen e Narah_mask0100

Roteiro
01-
Abra o PSP e o tube.
02-
Edit/ Copy. Feche o original.
03-
Edit/ Paste/ As New Image.
04-
Escolha duas cores contrastantes (uma escura e uma clara) da tube para fazer um
gradiente. Coloque a cor clara em background e a cor escura no foreground.
Configuração:
Sunburst/ Angle: 0/ Repeat: 20. CP: 50/100/FC: 50/50.
05-
Abra uma nova imagem de 1024x500 pxl transparente.
06-
Pinte com o gradiente.
07-
Layers/Duplicate.
08-
Image/Flip. Blend mode: Burn.
09-
Layers/Merge/Merge down.
10-
Effects/Distortion Effects/Polar Coordinates: Polar to rectangular.
11-
Layers/Duplicate.
12-
Image/Flip. Blend mode: lighten.
13-
Layers/Merge/Merge down.
14-
Effects/Distortion Effects/Polar Coordinates: Polar to rectangular.
15-
Image/Flip.
16-
Effects/Reflection Effects/Kaleidoscope: 50/10/45/30/2/2/50/reflect
17-
Plugins/Filter Unlimited 2.0/BGK Kaleidoscope/@BlueBerry
Pie.
18-
Effects/Geometric Effects/Pentagon: wrap
19-
Layers/Duplicate.
20-
Image/Mirror. Blend mode: lighten.
21-
Layers/Merge/Merge down.
22-
Plugins/Filter Factory F/Offsetter: 2/60/11/1.
24-
Plugin/Flaming Pear/Flexy2 conforme o print:

25-
Plugins/Filter Unlimited 2.0/Special Effects 1/Blur darkness: 128
26-
Aplicar a mask: Narah_mask0100.
27-
Effects/3D/Drop shadow: 0/10/100/5/preto. Repetir com valores negativos.
28-
Layers/New raster layer.
29-
Layers/Arrange/Send to bottom.
30-
Pinte com a cor clara.
31-
Plugin/dsbflux: Bright noise filter
100/mix.
32-
Edit/Copy no tube.
33-
Edit/Paste as new layer no top.
34-
Effects/3D Effects/Drop shadow: 0/20/100/25/preto.
35-
Layers/Merge/Merge down.
36-
Layers/Load/save mask/mask from disk: 113060 long FIBS mask by Shereen.
37-
Delete mask. Layers/Merge/Merge group
32-
Effects/3D Effects/Drop shadow: 5/0/100/2/preto.
33-
Layers/New raster layer.
34-
Layers/Arrange/Move down. Pintar com a cor clara.
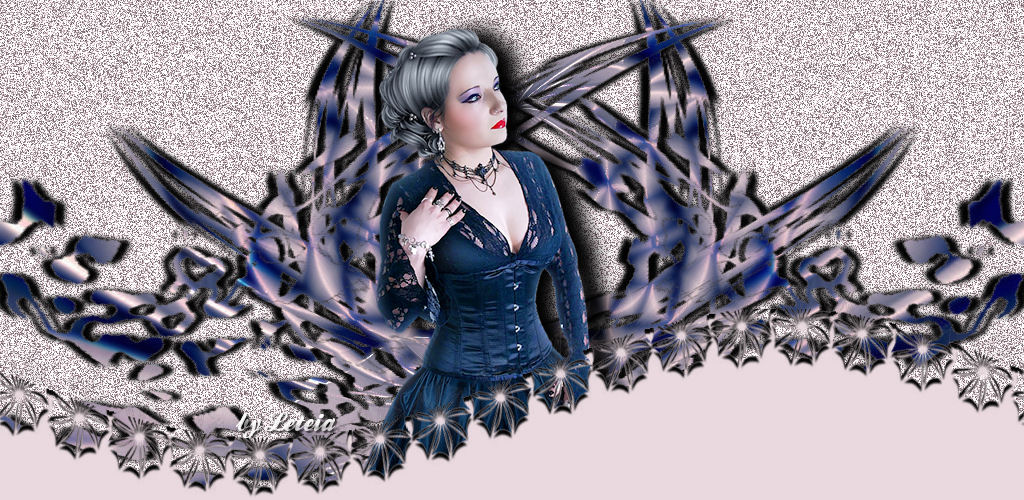
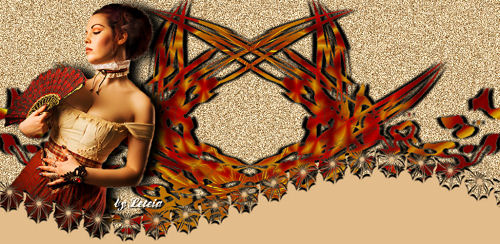
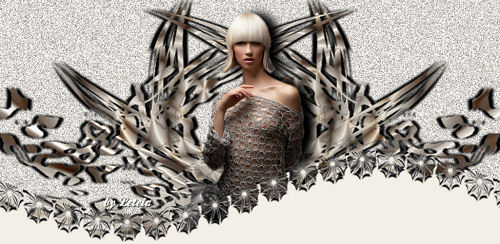
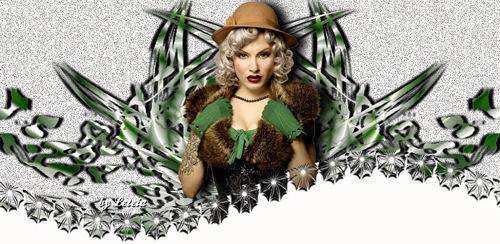
Outros exemplos:
Créditos:
Tube
principal: Gerry-Lady 234
Tube
1º exemplo: 2955-luzcristina
Tube
2º exemplo: womanbyClo510
Tube
3º exemplo: lady with hat tubes by Liza
Tutorial elaborado por Alessandra (Leteia), em 23 de maio de 2012, sendo proibida sua divulgação sem o prévio consentimento da autora.

