|


|
Tutorial de Alessandra
Link tutorial original:
Angela |
| Tubes Principais:
VM Tubes
|
| Link material:

 |
| Plugins: Simple
Eye Candy 6/Glass
unlimited 2 / BKG Designer sf10 I / Cruncher
Mura's Meister / Perspective Tiling
|
| Clique duas vezes no preset [leteia_anglea]
para instalar no plugin Salve a textura[024] na pasta
Textures do PSP
Abra a mask no PSP e minimize
Salve a seleção na pasta Selections do PSP |
SCRIPT
01. Open the material on the PSP / Duplicate (shift+d)
/ Close the originals
02. Choose a predominant color in the tube to match your work and
place it in the foreground. Put black in the background
05. Prepare a Radial gradient:
angle=0 / repeats=0 / invert unchecked / center point=50/50
06. Open a new transparent image measuring 800 x 600px
07. Paint with the gradient
08. Effects / Plugins / Simple / Pizza Slice Mirror (apply 2 times)
09. Layers / New Raster Layer
10. Paint with the background color
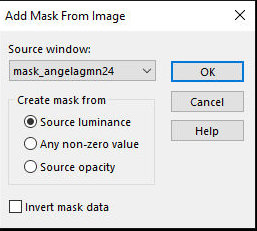
11. Layers / New mask Layer / From image / Mask [mask_angelagmn24]
12. Effects / Edge Effects / Enhance More
13. Merge Group
14. Activate the Raster 1 layer
15. Layers/Duplicate
16. Effects / plugins / unlimited 2 / BKG Designer sf10 I / Cruncher
40/40
17. Effects / Edge Effects / Enhance More
18. Layers / Properties / blend Mode: Screen
19. Merge Down
20. Merge visible
21. Layers/Duplicate
22. Effects/ plugins / Mura's Meister / Perspective Tiling
60 0 0 20 0 0 100 255
23. Drop shadow: 0 0 70 30 black
24. Layers / New Raster Layer
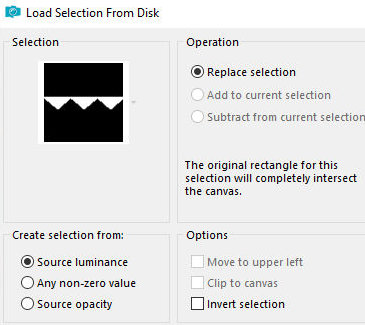
25. Selections / Load selection from disk / Selection [leteia_angela]
26. Paint with this Linear gradient using the same colors
angle=0 / repeats=0 / invert unchecked
27. Selections / Invert
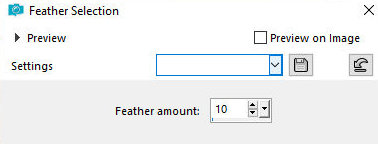
28. Selections / Modify / Feather=10
29. Press the Delete key on the keyboard 5 times
30. Select none
31. Effects / Plugins / Eye Candy 6 / Glass - Preset [leteia_angela]
Translator Note: Regarding this
plugin, you will notice that in my version it has no effect. I don't
have this plugin installed and given the difficulty in finding it
and also because it is a difficult plugin and my computer is
unreliable, I decided not to add the effect. However, if you have
the plugin you can use the effect without any problem, the preset is
in the material, just click on it twice.
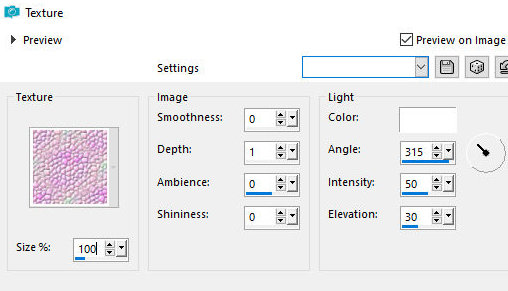
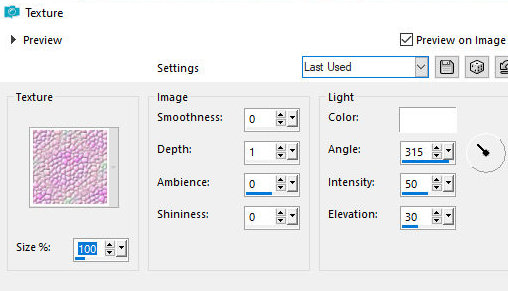
32. Effects / Texture Effects / Texture - (texture 025)
100 0 1 0 0 white 315 50 30
33. Effects / Edge Effects / Enhance More
34. Copy the tube character and paste it as a new layer
35. Resize if necessary and position as desired
36. Drop Shadow: 0 0 70 30 black
37. Copy the decorative tube and do the same procedures as the
character tube
38. Image / Add borders / symmetric marked / 3px / background color
39. Image / Add borders / symmetric marked / 30px / foreground color
40. Select this 30px border with the Magic Wand (tolerance/feather=0)
41. Effects / Texture Effects / Texture same as above
42. Selections / Invert
43. Drop shadow: 0 0 70 30 black
44. Select none
45. Image / Add borders / symmetric marked / 3px / background color
46. Put your signature
47. Save as jpeg
Tutorial traduzido em 06/11/2023
*
 |