|
|
|
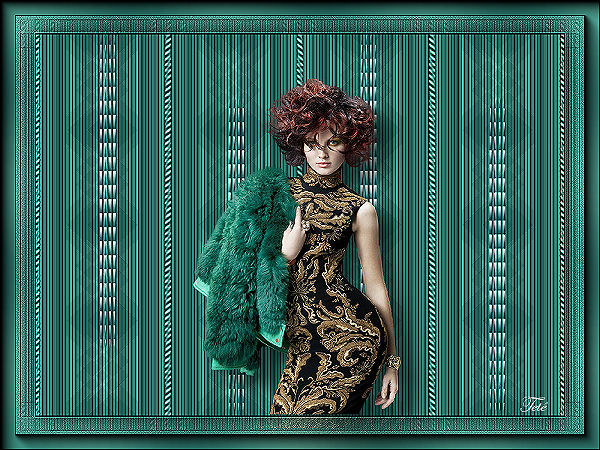
Material
1 Tube a sua escolha 1 elemento decorativo (anexado) Plugin Mock / Mosaic Plugin Mehdi / Sorting Tiles Plugin Simple / Zoom Out and Flip Plugin FM Tile Tools / Blend Emboss Plugin Toadies / What Are You? Plugin AP[Lines] / Lines - SilverLining Andrew's Filter Collection 59 / In And Out Of Filters Plugin Blur / TransBlur Plugin AAA Frames / Foto Frame
Roteiro
01- Abra o PSP e o Tube
02- Edit / Copy
03- Edit / Paste as New
Image
04- Feche o original
05- Escolha uma cor escura
que combine com seu trabalho, coloque no Foreground e coloque
uma cor clara no Background
06- Forme o seguinte
Gradiente:
Linear; 90 / 0 Invert desmarcado
07 - Abra uma transparência
800X600px
08- Pinte a Layer com esse
Gradiente
09- Effects / Plugins /
Mock / Mosaic com
Cell Size = 110
10- Effects / Plugins /
Mehdi / Sorting Tiles na configuração:
Block Range = 300-500 / Block = 500 / Crossed marcado
11- Effects / Plugins /
Simple / Zoom Out and Flip
12- Layers / Duplicate
13- Image / Flip
14- Mude o Blend Mode dessa
Layer para Lighten
15- Layers / Merge / Merge
Down
16- Effects / Plugins / FM
Tile Tools / Blend Emboss
17- Effects / Plugins /
Toadies / What Are You?na configuração:
20 / 20
18- Effects / Plugins /
AP[Lines] / Lines - SilverLining na configuração:
Line Option: Vertical; 5 / -1 / 10 / 0 / 0 / 0; Create lines not gaps marcado
19- Effects / Plugins /
Simple / Zoom Out and Flip
20- Ative a ferramenta
Selection Tool / Rectangle e em Custom Selection configure:
T = 0 / L = 0 / R = 400 / B = 600
21- Selections / Promote
Selection to Layer
22- Selections / Select
None
23-Image / Mirror
24- Layers / Merge / Merge
Down
26- Ative a ferramenta
Selection Tool / Rectangle e em Custom Selection configure:
T = 0 / L = 395 / R = 405 / B = 600
27- Selections / Promote
Selection to Layer
28- Selections / Select
None
29- Effects/ Plugins /
Andrew's Filter Collection 59 / In And Out Of Filters na
configuração:
26 / 11 / 33 / 119 / 86 / 78 / 90 / 79
30- Layers / Duplicate
31- Layers / Merge / Merge
Down
32- Layers / Duplicate
33- Ative a ferramenta Pick
e configure:
Mode / Scale; Position X = 595/ Position Y = 0 e desative a ferramenta
34- Duplique, ative a
ferramenta Pick e configure:
Mode / Scale; Position X = 794 / Position Y = 0 e desative a ferramenta
35- Layers / Merge / Merge
Down
36- Layers / Duplicate
37- Image / Mirror
38- Layers / Merge / Merge
Down (duas vezes)
39- Ative o elemento
decorativo anexado
40- Copie e cole na Tag
como nova Layer
41- Mude o Blend Mode Layer
para Hard Light
42- Ative a ferramenta
Pick e configure:
Mode / Scale; Position X = 490 / Position Y = 0 e desative a ferramenta
43- Layers / Duplicate
44- Ative a ferramenta
Pick e configure:
Mode / Scale; Position X = 685 / Position Y = 100 e desative a ferramenta
45- Layers / Merge / Merge
Down
46- Layers / Duplicate
47- Ative a ferramenta
Pick e configure:
Mode / Scale; Position X = 95 / Position Y = 0 e desative a ferramenta
48- Layers / Merge / Merge
Visible
49- Aplique seu tube
principal posicionando-o no centro da tag, redimensionando-o se
necessário e dando Drop Shadow a gosto
50- Image / Add Borders
com:
Symmetric marcado, 2 px, cor #000000
51- Image / Add Borders
com:
Symmetric marcado, 50 px, cor #FFFFFF
52- Selections / Select All
53- Selections / Modify /
Contract com:
Number of pixels = 50
54- Selections / Invert
55- Pinte com o Gradiente
formado pelas mesmas cores e configurado:
Linear; 45 / 10 Invert desmarcado
56- Adjust / Blur /
Gaussian Blur com
Radius = 50
57- Adjust/ Add-Remove
Noise / Add Noise na configuração:
Gaussian e Monochrome marcados/ Noise = 15
58- Effects / Plugins /
Blur / TransBlur na configuração:
22 / 9 / 0 / 0 / 0 / 0 / 0 / 0
59- Effects / Edge Effects
/ Enhance
60- Selections / Invert
61- Effects / 3D / Drop
Shadow assim configurado:
0 / 0 / 80 / 40 ; Cor: #000000
62- Selections / Select
None
63- Image / Add Borders
com:
Symmetric marcado, 2 px, cor #000000
64- Redimensione sua Tag
para os valores iniciais: 800X600px
65- Adjust / Sharpness /
Sharpen
66- Assine em nova Layer
67- Layers / Merge / Merge
All
68- Effects / Plugins / AAA
Frames / Foto Frame na configuração:
Default mudando Width para 20
69- Salve em jpg
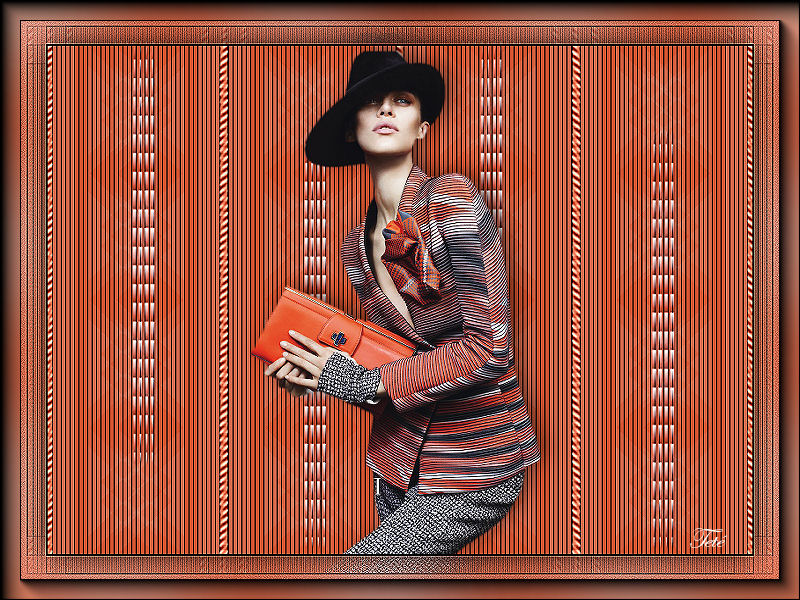
Modelo 1:
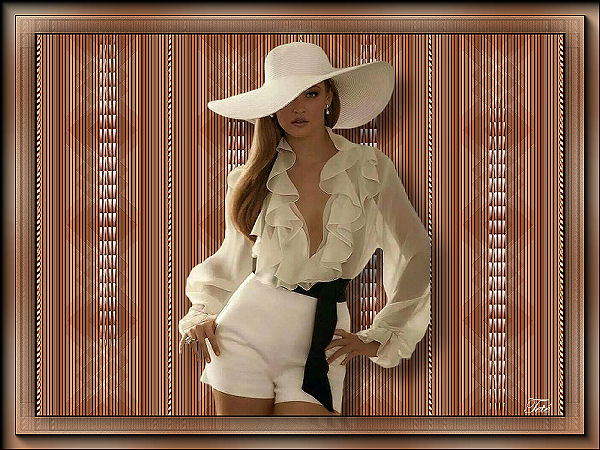
Modelo 2:
Créditos:
Na Tag principal e nos dois modelos os Tubes são de Suiza Bella. Tutorial criado por Tetê Samuel em 26 de janeiro de 2019, no Rio de Janeiro, RJ, sendo proibida sua divulgação sem o prévio consentimento da autora.
|