Material
Tube
Mask aconforti 10410
Efeitos do PSP X
Plugin Flaming Pear/
flexify
Roteiro
1 - Abra um tube no
PSP. Image/ resize/ 450/ Height. Adjust/ sharpness/ sharpen.
2 - Retire duas
cores e faça um gradiente linear/ 50/ 10 no background. Cor escura no
foreground, cor clara no background. Invet desmarcado.
3 - Abra uma imagem
transparente 1024X500 e pinte com o gradiente.
4 - Selections/
select all.
5 - Edit/ copy no tube.
Edit/ paste into selection no top. Selections/ select none.
6 - Effects/ image
effects/ seamless tiling/ default.
7 - Adjust/ blur/ radial
blur/ spin/ strength/ 50/ elliptical marcado. H/ 0/V/ 0/PC/ 0.
8 - Effects/
geometric effects/ circle/ repeat.
9 - Com a magic
wand tool/ tolerance/ 0 /feather/ 0, selecione as partes lisas da imagem e
delete. Selections/ select none.
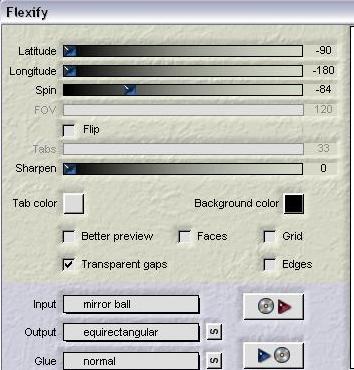
10 - Effects/
plugins/ Flaming Pear/ flexify, como no print.
11 - Image/
duplicate. Image/ mirror. Mude a blend mode para overlay.
12 - Layers/ merge/
merge down.
13 - Effects/ user
defined filter/ presets/ emboss 3.
14 - Layers/ new
raster layer. Layers/ arrange/ send to botton.
15 - Pinte com o
mesmo gradiente anterior. Adjust/ add remove noise/ add noise/ uniform/ 30/
monochrome.
16 - Layers/ merge/
merge visible.
17 - Aplique a mask
aconforti 10410. Delete/ merge group.
18 - Image/ canvas
size/ 1024X550/ bottom/ 50/ demais valores/ 0.
19 - Effects/ 3D
effects/ drop shadow/ 5/ 0/ 80/ 5,00. Preto.
20 - Layers/ new raster
layer. Layers/ arrange/ send to bottom.
21 - Pinte com uma cor
que combine.
22 - Cole o tube.
Effects/ 3D effects/ drop shadow/ a gosto.
23 - Layers/ merge/
merge all.
24 - Assine e salve
em jpeg.
Outro modelo
*Créditos:
Tubes: Angie
Mask: aconforti 10410
Tutorial criado por Natália
Raposo sendo proibida sua divulgação sem o prévio consentimento da autora