1 - Abra um tube no PSP. Retire
dele duas cores , coloque a escura no Foreground e
a clara no Background. Anote o RGB da cor escura
2 - Abra uma imagem
transparente 900X600 e pinte com qualquer cor
3 - Effects / Plugins/ Alf's Power Sines / 2 Diag Sin
Grads / Amplitude 41 / Frequency 125 / Red / Green /
Blue da cor escura / mode 28
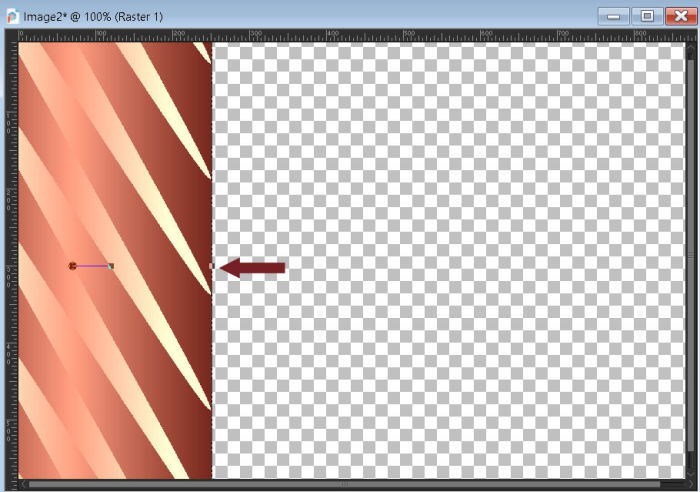
4 - View Rules. Com a ferramenta Pick ou Raster Deforme
Tool, posicionar a ferramenta onde mostra o print e
levar para o lado esquerdo até 250 mm :
5 - Tecle M no teclado, para desativar a
ferramenta Pick
6 - Layers / Duplicate / Image / Mirror Horizontal
7 - Layers / Merge/ Merge Down
8 - Effects / Plugins/ FFG B / Button Deluxe : 211 / 120
/ 118 / 123 / 122 /127
9 - Layers / Duplicate
10 - Effects / Distortion Effects / Lens Distortion : 0
/ 0 / Pincushion / 60 / Transparente marcado
11 - Effects/ 3D Effects/ Drop Shadow : 5 / 5 / 60 /
10,00. Preto. Repetir com V e H negativos (-5)
12 - Layers / Merge/Merge Down
13 - Effects / Reflections Effects / Rotation Mirror /
Default.
14 - Plugins / FM Tile Tools / Blend Emboss / Default
15 - Layers / New Raster Layer
16 - Pinte com um Gradiente Linear /Angle 90 /
Repeats 1/ Invet desmarcado, feito com as duas cores do
item 1
17 - Adjust / Add / Remove Noise / Add Noise / 25%/
Uniforme e Monochrome marcados
18 - Layers / Arrange / Send to Bottom
19 - Layers / Duplicate
20 - Effects / Texture Effects / Tiles / Preset Ceramic
Tiles
21 - Effects / Plugins / Mura's Meister / Perspective
Tiling : 80 / 0 / 0 / 18 / 0 / 0 /100 / 255
22 - Com a Magic Wand Tool, configurada em Tolerance 0,
Feather 10, contiguous, anti-alias e outside marcados,
selecione a parte transparente da Layer e aperte delete
no teclado 5 vezes Selections / Select None
23 - Selections / Select All. Image / Add Borders / 20 /
Cor contrastante
24 - Selections / Invert. Pinte com o Gradiente do item
16
25 - Effects / Texture Effectes / Tiles / Preset Ceramic
Tiles. Selections / Select None
26 - Image / Add Borders / 2 px / Symmetric marcado
Cor branca
27 - Imag e/ Add Border s/ 50px / Symmetric marcado Cor
contrastante
28 - Selecione a borda e pinte com o Gradiente anterior
com Invert marcado
29 - Adjust / Add / Remove Noise / Add Noise / 25% /
Uniforme e Monochrome marcados
30 - Selections / Invert
31 - Effects/ 3D Effects / Drop Shadow : 5 / 5 / 80 /
10,00. Preto. Repetir com V e H negativos (-5)
32 - Selections / Invert
33 - Effects / Plugins / AAA Frames / Foto Frame : 30 /
0 / 0 / 2 / 0 / 0 / 0 /100 / Default
34 - Selections / Select None
35 - Edit / Copy no Tube. Edit / Paste as New Layer na
Tag
36 - Effects / 3D Drop Shadow / a gosto
37 - Edit / Copy no Tube decorativo. Edit / paste as New
Layer na Tag
38 - Effects / 3D Effects / Drop Shadow / a gosto
39 - Layers / Merge / Merge All (Flatten)
40 - Image / Resize / 900 pixels / Width. Resize all
layers marcado
41 - Adjust / Sharpness / Sharpen
42 - Assine e salve em Jpeg