|

|
Material
Efeitos do PSP2018 Tube de personagem Tube misted de paisagem (de preferência com cores mais suaves) Alpha Channel: ac_leteia_redfield 
Plugins
Redfield / Ripples Magic: Galaxy Redfield / Craquelure 3D: Water Ripples Redfield / Umatrix: Cubismic
Roteiro
01- Abra o PSP, o tube de personagem, o tube misted e o Alpha Channel 02- Edit / Copy. Feche os originais 03- Edit / Paste / As New Image 04- Escolha 2 cores do tube Escura em foreground e clara em background 05- Forme um gradiente: Linear / Angle: 45 / Repeats: 1 Invert desmarcado 06- Abra o Alpha Channel e pinte com o gradiente 07- Selections / Select All 08- Edit / Copy no tube misted 09- Edit / Paste Into Selection 10- Selections / Select None 11- Effects / Reflection Effects / Kaleidoscope / preset Stripe fig: 
12- Layers / Duplicate
13- Effects / Plug-ins / Redfield / Ripples Magic: Galaxy: 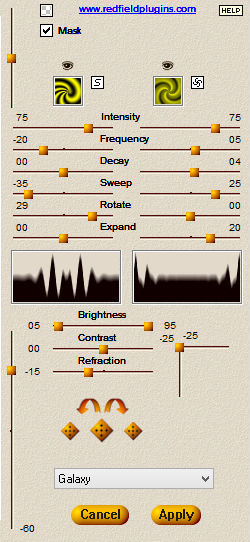
14- Layers / Merge / Merge Down
15- Selections / Load/Save Selection / Load Selection From Alpha Channel: ac_leteia_ / Selection # 1 16- Selections / Promote Selection to Layer 17- Effects / Plug-ins / Redfield / Craquelure 3D: Water Ripples: 
18- Selections / Invert
19- Effects / 3D Effects / Drop Shadow: 0 / 0 / 100 / 60 / #000000 20- Selections / Select None 21- Adicione nova Layer 22- Selections / Load/Save Selection / Load Selection From Alpha Channel: ac_leteia_ / Selection # 2 23- Pintar com o Gradiente 24- Effects / 3D Effects / Drop Shadow: 0 / 0 / 70 / 20 / #000000 25- Selections / Select None 26- Adicione nova Layer 27- Selections / Load/Save Selection / Load Selection From Alpha Channel: ac_leteia_ / Selection # 3 28- Pinte com o Gradiente 29- Effects / Plug-ins / Redfield / Umatrix: Cubismic 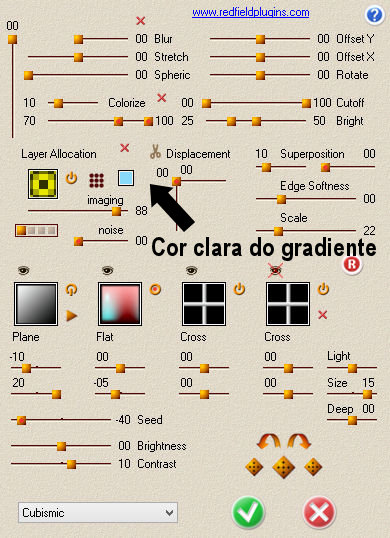
30- Adjust / Hue and Saturation / Colorize de
acordo com seu trabalho, se necessário
31- Effects / Edge Effects / Enhance More 32- Edit / Copy no misted 33- Edit / Paste As New Layer Resize se necessário 34- Coloque dentro da seleção 35- Selections / Invert. Delete no teclado 36- Selections / Invert 37- Layers / Merge / Merge Down 38- Selections / Modify / Select Selection Borders: Inside / 15 / Anti-alias marcado 39- Effects / 3D Effects / Inner Bevel: present Almofada_2 40- Effects / 3D Effects / Drop Shadow: 0 / 0 / 80 / 20 / #000000 41- Selections / Select None 42- Edit / Copy no tube de personagem 43- Edit / Paste As New Layer 44- Effects / 3D Effects / Drop Shadow: 0 / 0 / 80 / 20 / #000000 45- Image / Add Borders: 5 pxl / Symmetric marcado / #ffffff 46- Image / Add Borders: 5 pxl / Symmetric marcado / cor do foreground 47- Image / Resize: Width: 900 / Height: 600 / Lock aspect ratio desmarcado / Resize all Layers marcado 48- Assinar e salvar como jpeg Outros exemplos 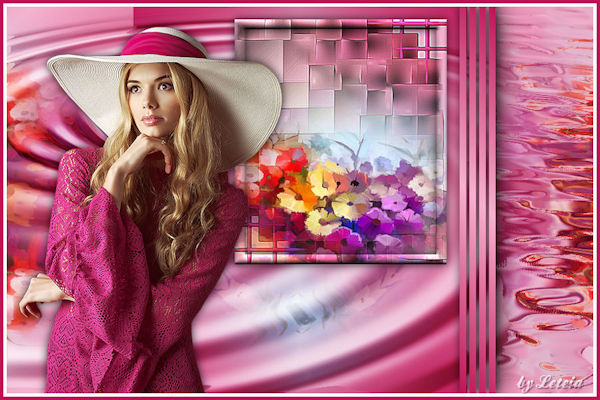 
Créditos
Tube de personagem principal: Femme 692 by Lily Tube misted principal: KaD_Beach5 Tube 1º exemplo: Femme 736 by Lily Tube misted 1º exemplo: KaD_Misted_Summerflowers1 Tube 2º exemplo: Woman_Tube_24_GB Tube misted 2º exemplo: KaD_CityByNight1 Tutorial elaborado por Alessandra (Letéia), em 16 de agosto de 2020
|